Running OpenCV In Your RICOH THETA
This article was originally published in Japanese by roohii_3 on the Qiita blogging site.
Special thank you - We got the repo from community member @Kasper and have built and used it ourselves. Nice work!
I attempted to run OpenCV inside a RICOH THETA. I hope this will be a good reference for people interested in building an app using OpenCV with Android Studio + NDK (ndk-build).
Introduction
Hello, this is @roohii_3 from RICOH.
RICHO THETA is our company’s 360 degree camera. The newest version (as of December 2018) THETA V has an Android based OS. THETA can be customized the same way Android apps are. This customization is called “plug-ins.”
By combining OpenCV + the Cloud, using a THETA plug-in, it might be possible to setup an IoT sort of use, like recognizing an object and shooting an image, then uploading it up to the Cloud. So, let’s start up OpenCV using a THETA plug-in.
Development Environment
- OpenCV Android pack ver. 3.4.4
- Android Studio ver. 3.2.1
- JDK ver. 1.8.0_191
- NDK ver. 18.1.5063045
- gradle ver. 4.6
- RICOH THETA V Firmware ver. 2.50.1 (Android ver. 7.1.2 / API level 26)
Preparation
OpenCV Android pack
-
Download the newest version of “Android pack” from the OpenCV Releases page.
-
After unzipping the downloaded file, save it to any convenient location. I renamed ”OpenCV-android-sdk” to ”OpenCV-3.4.4-android-sdk”, and saved it here:
C:/opencv/OpenCV-3.4.4-android-sdk
Android Development Environment
Android Studio
From Android Developers, download and install Android Studio.
Android SDK・Tools
-
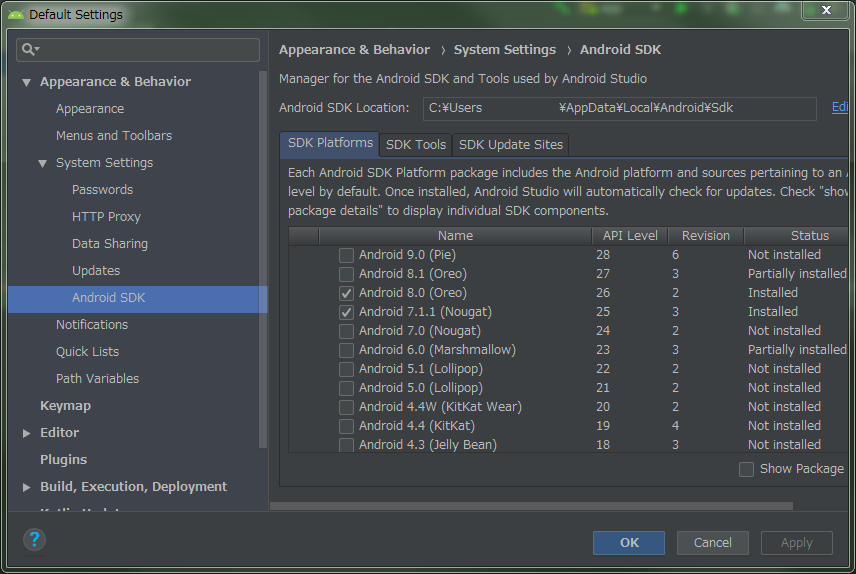
Open ”Tools > SDK Manager” from the Android Studio menu.
-
From the ”SDK Platforms” tab, check the necessary boxes depending on the Android version.
- In the ”SDK Tools” tab, if these boxes are not checked, check them.
- Android SDK Build-Tools
- Android SDK Platform-Tools
- Android SDK Tools
- Google USB Driver
- NDK
- Click “OK”
JDK
From the link below, download and install ”Java SE Developer Kit 8”
https://www.oracle.com/technetwork/java/javase/downloads/jdk8-downloads-2133151.html
RICOH THETA V
When using THETA, reference the links below to set it to developer mode.
-
Join the RICOH THETA Plug-in Partner Program here
-
RICOH Blog Post: “THETA Plug-in Development - Steps for Putting Your THETA into Developer Mode”
OpenCV for Android
According to “Android Development with OpenCV” in the OpenCV official docs, there are number of ways to use OpenCV with Android.
-
Using with Java
1.1 Using OpenCV Manager
1.2 Using Static Linked Library
-
Using with C/C++ and NDK
- It seems that there are two ways to do builds: “CMake” or “ndk-build”
It appears that “1.1 Using OpenCV Manager” is recommended in the OpenCV official docs. (Footnote 1: ”Using async initialization is a recommended way for application development. It uses the OpenCV Manager to access OpenCV libraries externally installed in the target system.”) (Footnote 2: For OpenCV Manager, details are in [Android OpenCV Manager] The document is ver.2.4, so the information might be old.). However, because THETA is not always connected to network, OpenCV Manager features cannot be fully taken advantage of.
Therefore, that means using 1.2 or 2. This time “2. Using with C/C++ and NDK” will be used. “ndk-build” is used for the build.
Preparing the Project File・NDK Build Environment
- Creating a new Android Studio project
Open Android Studio, select “File > New Project”. Follow the screen and create “Empty Activity”.
- No need to check “Include C++ support”. When this is checked, it appears that CMakeList.txt will be created. However, this time ndk-build is used, so there is no need.
- Creating the build file
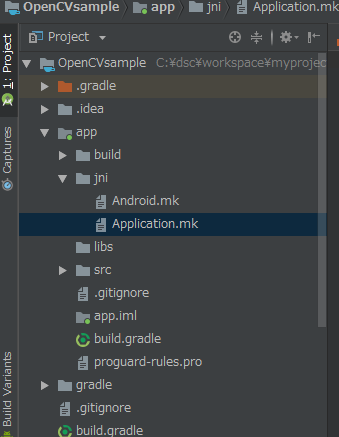
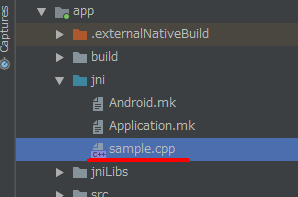
Create a “jni” directory under the “app” directory, and create “Android.mk” and “Application.mk”.
For each file, input the following:
【Android.mk】
- In the
includeon Line 7, add the path for “OpenCV.mk” in the OpenCV Android pack. - In
LOCAL_MODULE, create an arbitrary name (the library name generated by NDK). -
In
LOCAL_SRC_FILES, create source name of C/C+ (native code). ※ If there are multiple native codes, it appears a space is used to indicate the difference. (Footnote 3: https://developer.android.com/ndk/guides/android_mk?hl=en)LOCAL_PATH := $(call my-dir)
include $(CLEAR_VARS)
OPENCV_INSTALL_MODULES:=on OPENCV_LIB_TYPE:=SHARED include C:\opencv\OpenCV-3.4.4-android-sdk\sdk\native\jni\OpenCV.mk
LOCAL_MODULE := opencvsample LOCAL_SRC_FILES := sample.cpp include $(BUILD_SHARED_LIBRARY)
【Application.mk】
-
For
APP_ABI,create suitable one depending on your platform.APP_STL := c++_static APP_CPPFLAGS := -frtti -fexceptions APP_ABI := armeabi-v7a
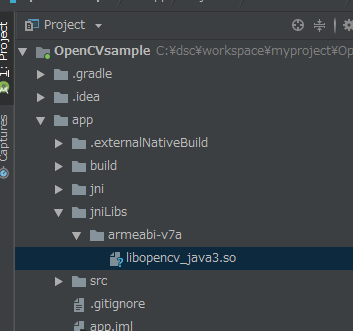
- Copying the OpenCV library (.so file)
Create a “jniLibs” directory under the “app” directory, then copy and paste the OpenCV library (.so file). Copy and paste the necessary library file into each directory, depending on your platform.
What to copy C:/(Where OpenCV Android pack is located)/sdk/native/libs/armeabi-v7a
Where to copy to C:/(Where the Project File is located)/app/jniLibs/armeabi-v7a
- Editing build.gradle
Open build.gradle(Module:app) and add NDK configuration as below.
• For moduleName configure the name of LOCAL_MODULE in “Android.mk” by adding “lib” at the beginning of the name.
• Set the value of abiFilters to the appropriate amount depending on your platform.
android {
    ...
    defaultConfig {
        ...
        ndk {
            moduleName "libopencvsample"
            abiFilters 'armeabi-v7a'
        }
    }
}
When “Sync Now” appears in upper portion of the editor window, click it.
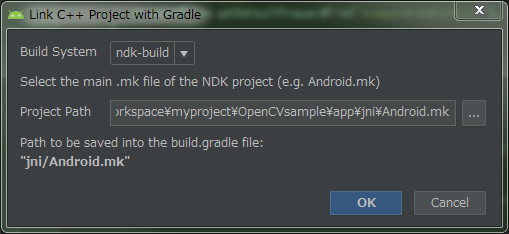
- Configuring the Build System
Right click “app” in the project tree, and select “Link C++ Project with Gradle”
Specify the path of “ndk-build” in an open window of the Build System, set “Android.mk” in the path for Project Path, and click OK.
Implementation
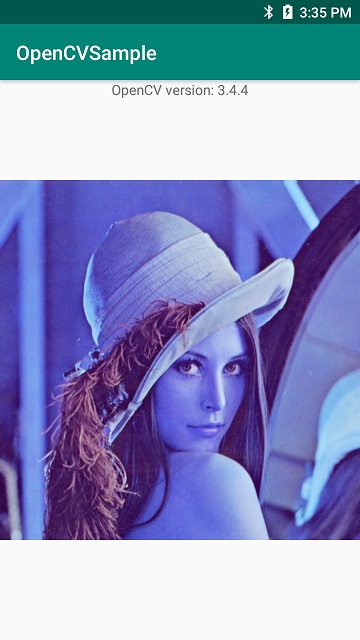
Here, we will open “lena.jpg” that is placed on “drawable,” start up OpenCV in Native code, change the color space from RGB to BGR, and display that in ImageView.
Here, we open “lena.jpg” which has been placed in “drawable”, move OpenCV in Native code, convert color space from RGB to BGR, and display it on ImageView.
Layout
TextView, which displays the version, and ImageView, which displays the post treatment image, are configured.
<?xml version="1.0" encoding="utf-8"?>
<android.support.constraint.ConstraintLayout xmlns:android="http://schemas.android.com/apk/res/android"
    xmlns:app="http://schemas.android.com/apk/res-auto"
    xmlns:tools="http://schemas.android.com/tools"
    android:layout_width="match_parent"
    android:layout_height="match_parent"
    tools:context=".MainActivity">

    <TextView
        android:id="@+id/textView"
        android:layout_width="wrap_content"
        android:layout_height="wrap_content"
        app:layout_constraintLeft_toLeftOf="parent"
        app:layout_constraintRight_toRightOf="parent" />

    <ImageView
        android:id="@+id/imageView"
        android:layout_width="wrap_content"
        android:layout_height="wrap_content"
        app:layout_constraintBottom_toBottomOf="parent"
        app:layout_constraintLeft_toLeftOf="parent"
        app:layout_constraintRight_toRightOf="parent"
        app:layout_constraintTop_toTopOf="parent"/>

</android.support.constraint.ConstraintLayout>
Java Code
With “Android.mk”, add “lib” to the beginning of the library name, which was configured in LOCAL_MODULE, and read with System.loadLibrary().
The native code function is declared public native String version();
package com.theta360.opencvsample;

import android.graphics.Bitmap;
import android.graphics.BitmapFactory;
import android.support.v7.app.AppCompatActivity;
import android.os.Bundle;
import android.widget.ImageView;
import android.widget.TextView;

import java.nio.ByteBuffer;

public class MainActivity extends AppCompatActivity {

    // load native library
    static {
        System.loadLibrary("opencvsample");
    }

    private TextView mTextView;
    private ImageView mImageView;

    @Override
    protected void onCreate(Bundle savedInstanceState) {
        super.onCreate(savedInstanceState);
        setContentView(R.layout.activity_main);

        // OpenCV version
        mTextView = (TextView) findViewById(R.id.textView);
        mTextView.setText("OpenCV version: " + version());

        // load the picture from the drawable resource
        Bitmap img = BitmapFactory.decodeResource(getResources(), R.drawable.lena);

        // get the byte array from the Bitmap instance
        ByteBuffer byteBuffer = ByteBuffer.allocate(img.getByteCount());
        img.copyPixelsToBuffer(byteBuffer);

        // call the process from the native library
        byte[] dst = rgba2bgra(img.getWidth(), img.getHeight(), byteBuffer.array());

        // set the output image on an ImageView
        Bitmap bmp = Bitmap.createBitmap(img.getWidth(), img.getHeight(), Bitmap.Config.ARGB_8888);
        bmp.copyPixelsFromBuffer(ByteBuffer.wrap(dst));
        mImageView = (ImageView) findViewById(R.id.imageView);
        mImageView.setImageBitmap(bmp);
    }

    // native functions
    public native String version();
    public native byte[] rgba2bgra(int width, int height, byte[] src);
}
Native code
OpenCV processing will be done in C/C++.
Under “app > jni”, create a C/C++ file with any name.
In LOCAL_SRC_FILES of “Android.mk”, set the file name that you just created.
There seems to be unique rules for functions used in Java ↔ Native(C/C++). It’s defined here:
JNIEXPORT [return value format] JNICALL Java_[relative path from the top source directory for Java source]_[Java class name of caller origin]_[function name](JNIEnv *, jobject, [argument], ...))
It seems both the returned value and argument forms used are also unique.
For details, please refer to JNI Types and Data Structures.
#include <jni.h>
#include <string>
#include <opencv2/core.hpp>
#include <cv.hpp>

extern "C"
{
    JNIEXPORT jstring JNICALL
    Java_com_theta360_opencvsample_MainActivity_version(
            JNIEnv *env,
            jobject) {
        std::string version = cv::getVersionString();
        return env->NewStringUTF(version.c_str());
    }

    JNIEXPORT jbyteArray
    JNICALL Java_com_theta360_opencvsample_MainActivity_rgba2bgra
            (
                    JNIEnv *env,
                    jobject obj,
                    jint w,
                    jint h,
                    jbyteArray src
            ) {
        // Obtaining element row
        // Need to release at the end
        jbyte *p_src = env->GetByteArrayElements(src, NULL);
        if (p_src == NULL) {
            return NULL;
        }

        // Convert arrangement to cv::Mat
        cv::Mat m_src(h, w, CV_8UC4, (u_char *) p_src);
        cv::Mat m_dst(h, w, CV_8UC4);

        // OpenCV process
        cv::cvtColor(m_src, m_dst, CV_RGBA2BGRA);

        // Pick out arrangement from cv::Mat
        u_char *p_dst = m_dst.data;

        // Assign element for return value use
        jbyteArray dst = env->NewByteArray(w * h * 4);
        if (dst == NULL) {
            env->ReleaseByteArrayElements(src, p_src, 0);
            return NULL;
        }
        env->SetByteArrayRegion(dst, 0, w * h * 4, (jbyte *) p_dst);

        // release
        env->ReleaseByteArrayElements(src, p_src, 0);

        return dst;
    }
}
Execution
When executed, the following will be displayed.
*THETA does not have a display, so Vysor is used.
Conclusion
Next time around, I would like to make something that more fully takes advantage of the characteristics of 360 degree images, since this exercise was just to check the operation of OpenCV running inside a THETA. When I make more progess, I will post the results.
About the RICOH THETA Partner Program
If you are interested in THETA plug-in development, please register for the partner program!
Please be aware that the THETA with its serial number registered with the program will no longer be eligible for standard end-user support.
For detailed information regarding partner program please see here.
The registration form is here.