
1. Additional Live Streaming Guides
This is part of a set of live streaming guides and videos that are available on the RICOH THETA live streaming site.
2. Camera Models
| Model | Streaming Supported | Stitching | Max Resolution | Output Connection |
|---|---|---|---|---|
THETA Z1 |
Yes |
Internal |
3840x1920 @ 30fps |
Wi-Fi, Ethernet, USB - |
THETA V |
Yes |
Internal |
3840x1920 @ 30fps |
Wi-Fi, Ethernet, USB - |
THETA S |
Yes |
External |
1920x1080 @ 30fps |
USB, HDMI |
RICOH R Dev Kit |
Yes |
Internal |
1920x1080 @ 30fps |
USB, HDMI |
THETA SC2 |
No |
Not supported |
N/A |
N/A |
THETA SC |
No |
Not supported |
N/A |
N/A |
| Streaming the THETA V through a Wi-Fi router or mobile hotspot requires the Wireless Live Streaming plug-in, a free download from the THETA Store. |
| THETA V and Z1 Ethernet connection requires a USB OTG Ethernet adapter plugged into the USB port. In most use cases, the THETA V will not charge while using Ethernet. The battery will drain. Community members have reported success using a splitter to stream with Ethernet while powering the THETA V. |
| The RICOH R Dev Kit supports internal stitching for both USB and HDMI. The video quality is 1920 x 960 with actual size output of 1920 x 960 + 120. |
The most common method of streaming the THETA V and Z1 is with a USB cable connected to a Windows or Mac computer. However, it is possible to stream using WiFi. All the methods below use free software.
| Method | Software Needed | Note |
|---|---|---|
USB to laptop then to YouTube over Internet |
Windows 10 users need a driver. See live streaming site. |
Z1 can charge while streaming |
Wi-Fi MotionJPEG from camera to mobile app or web browser on same network |
Camera can stream MotionJPEG without additional software |
this is the live preview in the mobile app |
Wi-Fi RTMP to sites such as YouTube. Stream direct from camera |
Max resolution is 3840x1920 @ 30fps. Mobile phone or laptop not required to stream to YouTube. |
|
Wi-Fi RTSP to video players such as VLC, ffplay, GoPro VR Player |
Max resolution is 3840x1920. Connect over Wi-Fi to a laptop running video player software. |
| The THETA V can stream for about 8 hours. It consumes slightly more power while streaming than the the charge provided. With USB-C, the Z1 can stream indefinitely. Heat may be a problem. |
3. RICOH THETA V and Z1 Software
3.1. Wi-Fi RTMP Streaming Direct to YouTube
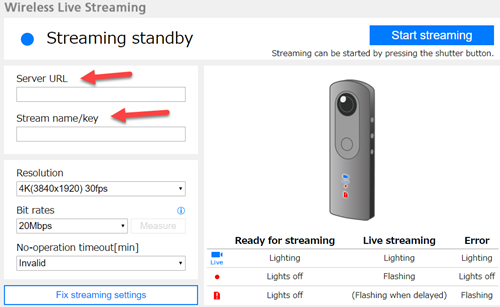
With the Wireless Live Streaming plug-in, you can stream the THETA V and Z1 through a Wi-Fi router or a mobile phone used as a hotspot to YouTube Live Events in 360 or other live event sites that use RTMP. Most cloud services like YouTube use RTMP. As of July 8, 2020, Facebook live events, which also uses RTMP, no longer works with 360 live events. We hope that Facebook will add this feature back in the future. A step-by-step guide is available here.
The plug-in is free to install. Source code is also available if you wish to modify the plug-in or build your own streaming application.

The Wireless Live Streaming Guide shows how to configure that THETA V using a browser-based configuration tool. You will need to enter the YouTube streaming server URL and the Stream key.
3.2. Wi-Fi RTSP Streaming Direct to Computer
RTSP is used to stream your camera live video to a desktop application running on your laptop or headset. You can see the RTSP stream in software such as VLC, ffplay, or GoPro VR Player 3.
Get the THETA RTSP Streaming plug-in from the THETA Store. It is free to download and use.
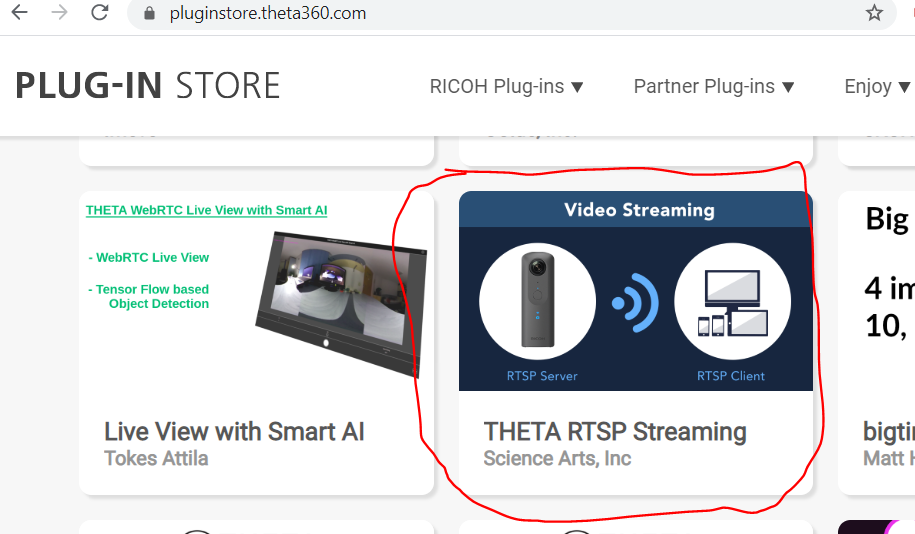
Press install.
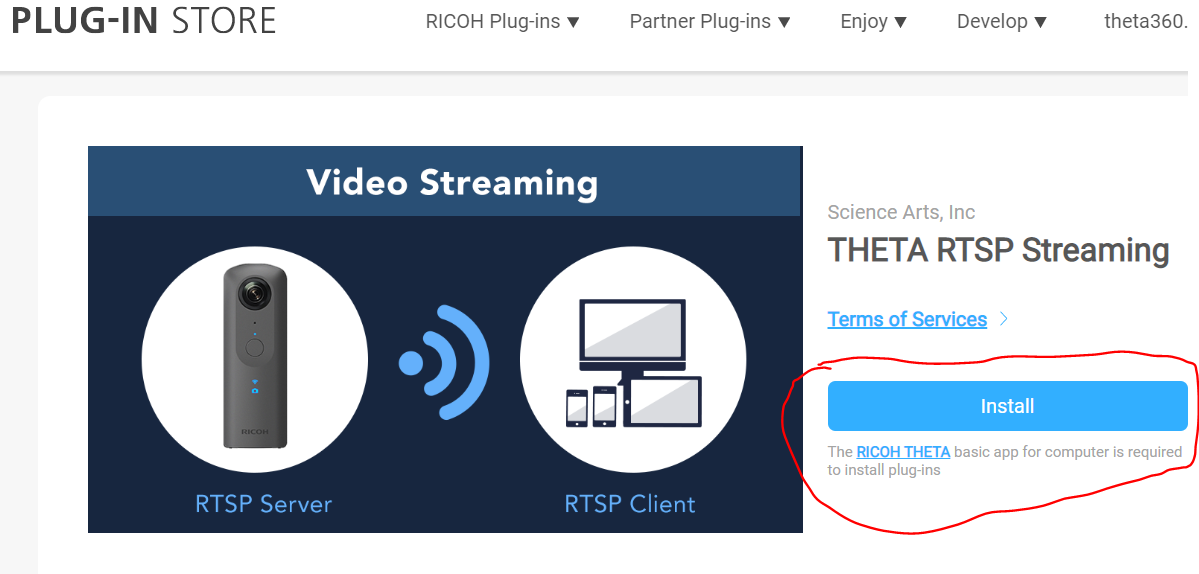
The RICOH desktop software, the Basic App, will install the plug-in on your camera. You must have the Basic App installed on your computer.
After the plug-in is installed, you must activate it with the Plug-in management window of the RICOH desktop app, Basic App.
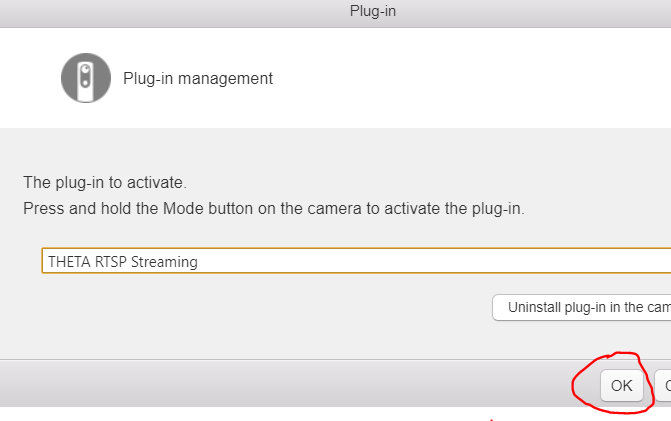
With the plug-in activated, you can start the plug-in by pressing and holding the mode button of the camera.
To use the plug-in, you must connect the THETA V to your home router with Client Mode and obtain the IP address of the camera.
The mobile app will show the IP address of the camera.
Put the camera into plug-in mode by pressing and holding the mode button on the camera.
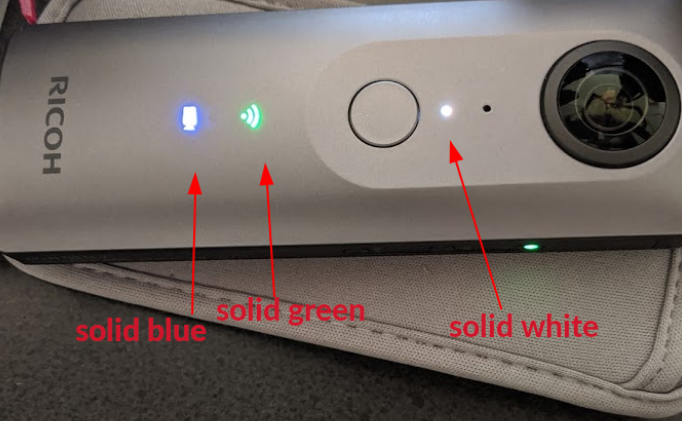
When the THETA V is running the THETA RTSP Streaming plug-in, it will display the LEDs shown below.
Test with VLC.
-
Confirm THETA V is running the plug-in effectively per the steps described above.
-
Start VLC
-
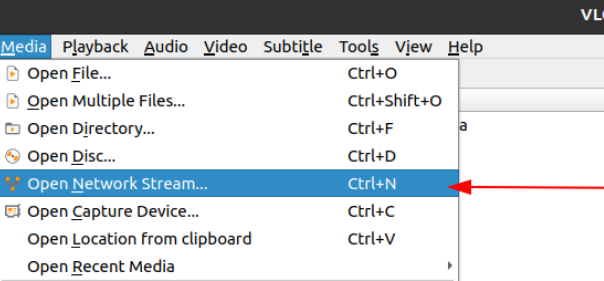
Under Media, select Open Network Stream
-
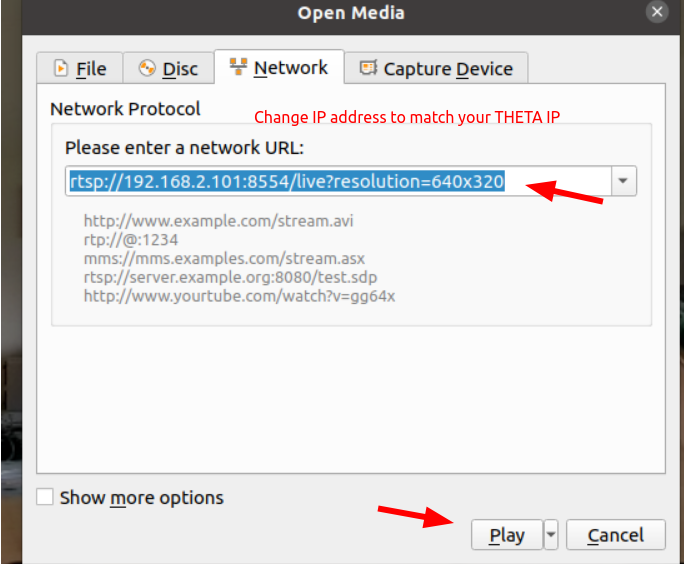
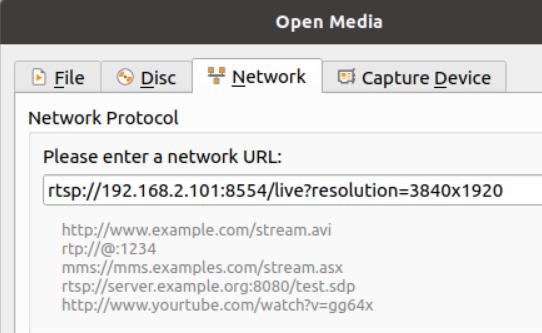
Change IP address to your THETA camera. Example rtsp://192.168.2.101:8554/live?resolution=640x320 for the network URL
-
Press “Play”
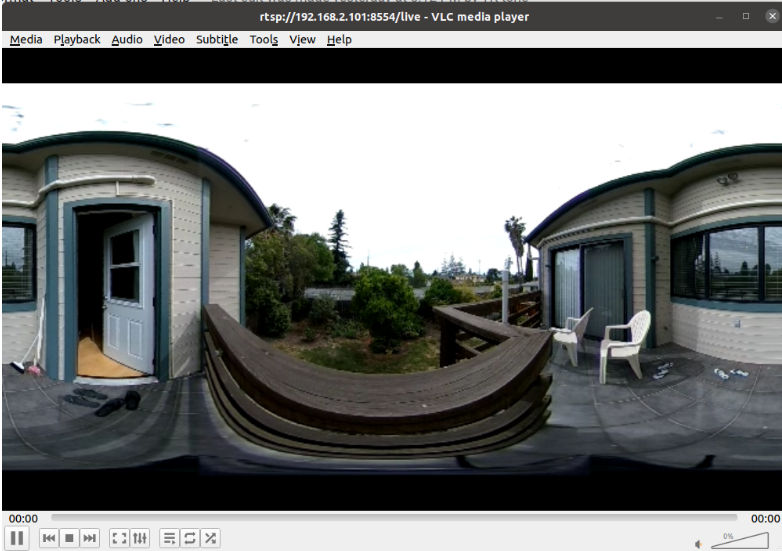
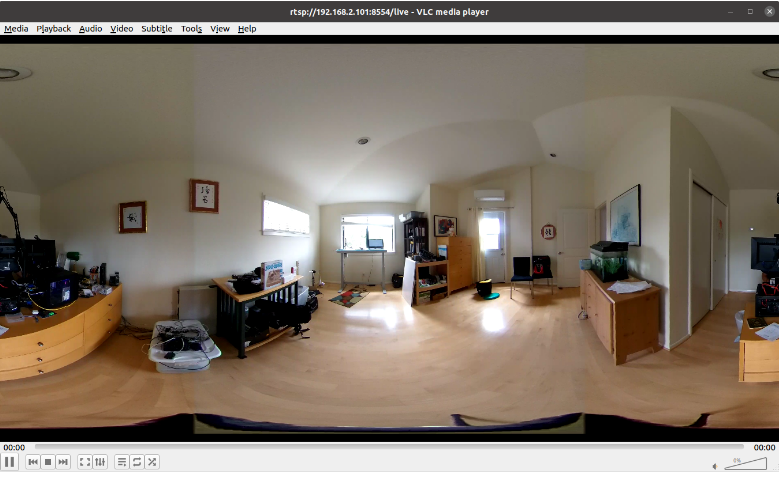
An equirectangular view of the video feed from the THETA will appear in VLC.
No wires needed!
You can adjust the video resolution to 1920x960 or 3840x1920.
The video looked great with a high framerate and low latency.
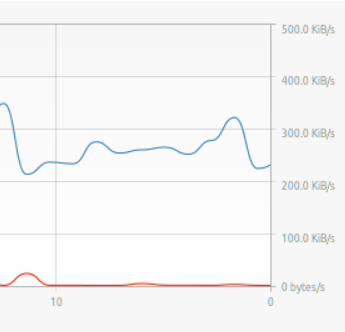
At 3840x1920 network traffic was 300 KiB/second.
3.3. Ethernet RTSP Streaming Direct to Computer
The RTSP plug-in works with Ethernet. To test the plug-in, I used an USB to Ethernet adapter and Y-splitter for the adapter to also test if I can charge the camera while it is streaming over Ethernet.
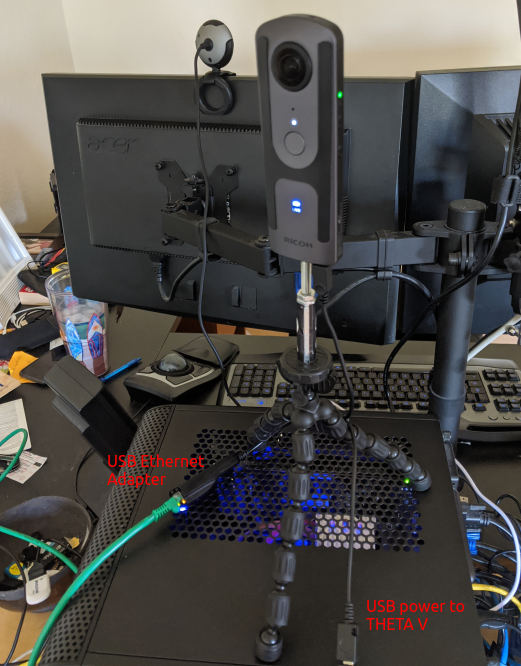
With my computer and the THETA V on the same subnet, I found the IP address of the THETA V by running a script on my computer. The script is part of my theta-client-mode tests on GitHub.

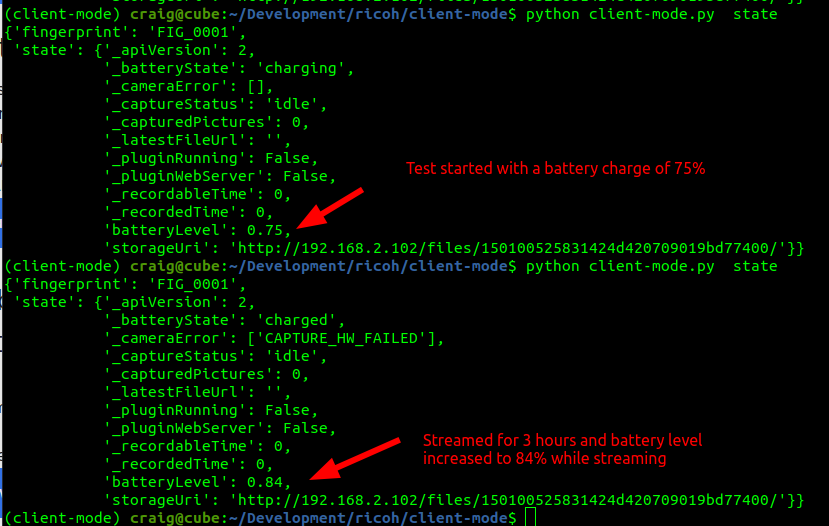
To establish a baseline prior to the RTSP Ethernet test, I used the same script to check the camera state.
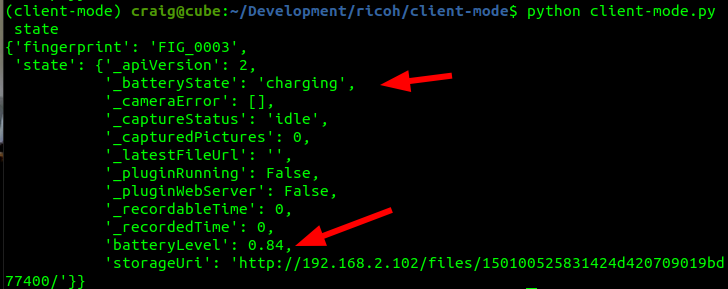
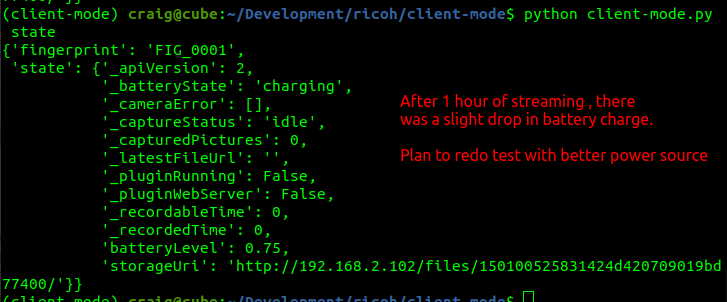
The state looks very promising. The camera indicates that it’s charging. Battery level is at 84%.
I started the plug-in by pressing and holding the lower mode button of the THETA V.
I opened a network stream with vlc.
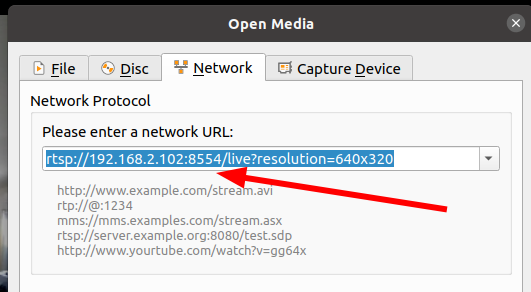
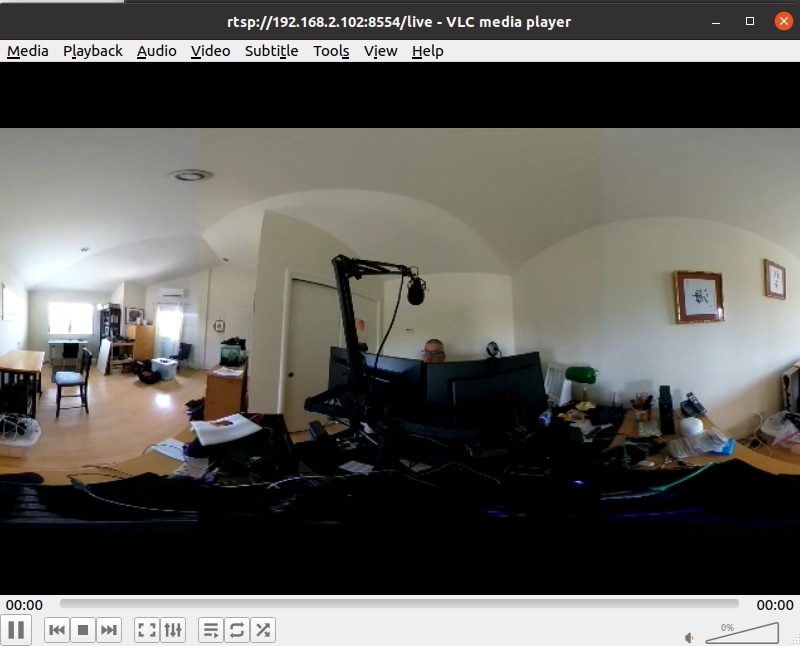
Latency is around 2 seconds with my test resolution of 640x320.
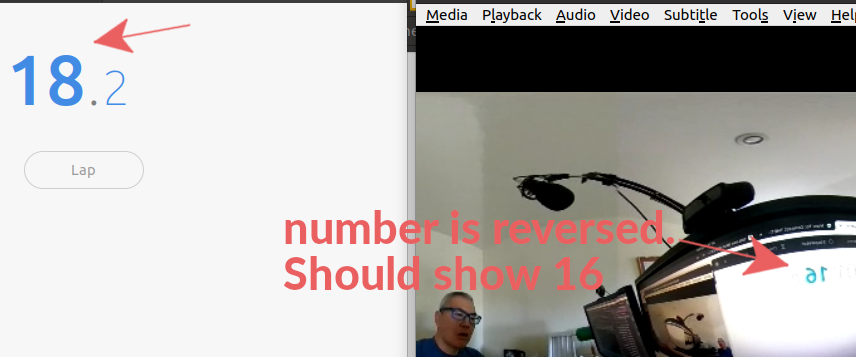
At this point, I’ve been streaming over Ethernet for 40 minutes continuously.
After an hour of streaming over Ethernet, the battery did drop a little.
3.3.1. GoPro VR Player 3
To get a 360 view of the live stream, you can use GoPro VR Player 3.
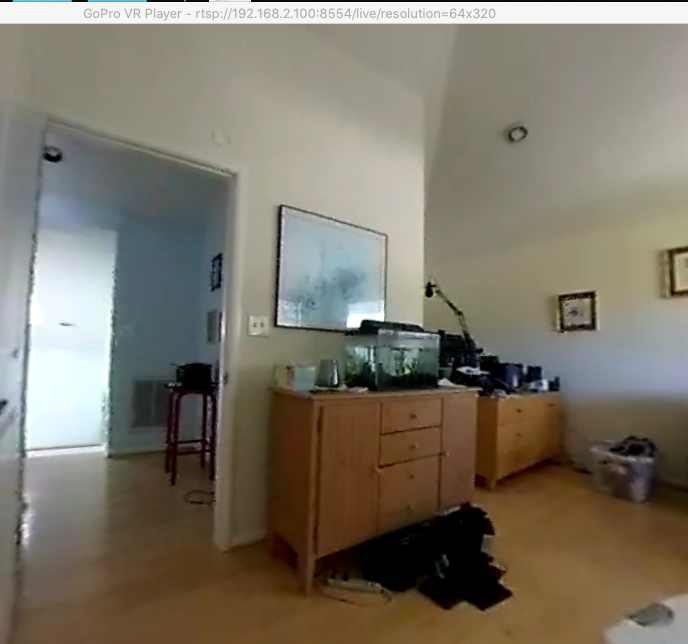
In my tests on July 12, 2020, I was only able to use GoPro VR Player 3 on Mac. When I tried to use the player on Windows with THETA RTSP plug-in, the GoPro VR Player would crash. This is a low-resolution test.
GoPro VR Player for Desktop Downloads
-
[Windows](https://gopro.com/downloads/PC/GoProVRPlayer/latest) - Did not work as of July 12, 2020
3.4. THETA V Streaming with Ethernet -
You can stream the THETA V using Ethernet using a USB OTG adapter. See this article for more information. Not all USB OTG Ethernet adapters will work.
Community member Kev091190 has reported success using an USB splitter with the THETA V. Oppkey staff tested a different USB OTG Ethernet adapter and USB splitter and had similar results.
A picture of his cable setup is shown below.
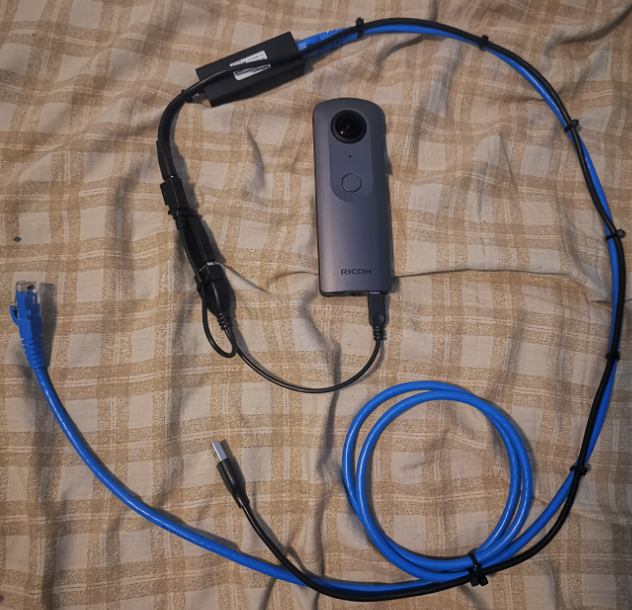
Kevin is using the SinLoon 30cm USB 2.0 Data Charge Y Splitter Cable.
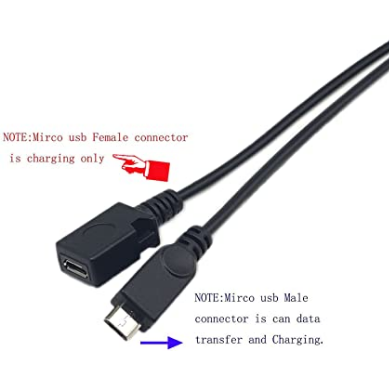
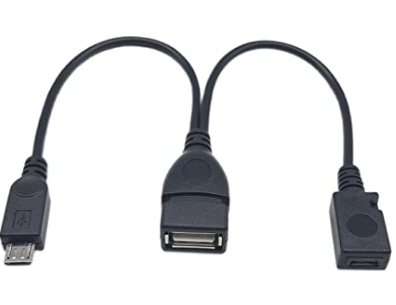
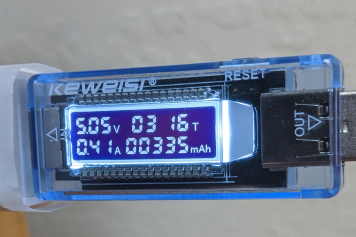
To test the charging, Oppkey connected a current meter to the Y-splitter. In the first test, we looked at the charge prior to streaming the camera with Ethernet.
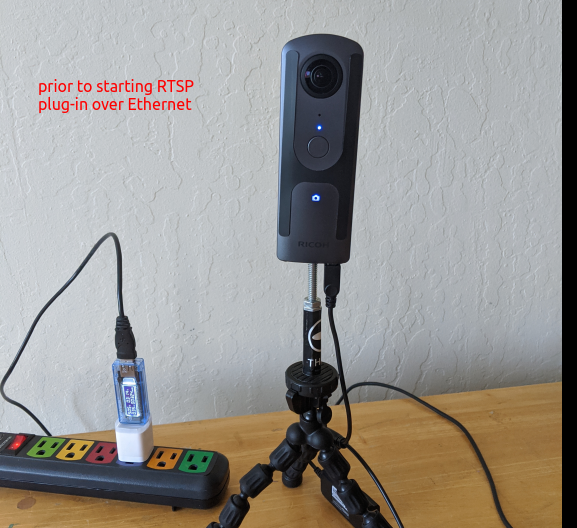
Prior to the plug-in starting, the camera drew 0.41Amps.
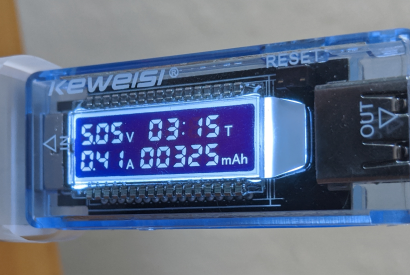
After the plug-in started, the camera current draw did not change. It remained at 0.41amps.
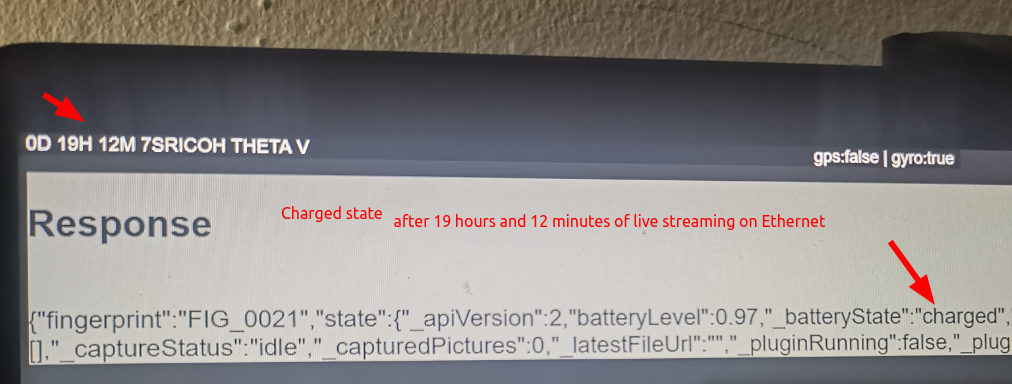
I connected the camera to a 2amp power source and streamed it for three hours. The battery charge increased from 75% to 84% during the streaming session. The camera body was warm, but not hot at the end of the test. In the next test, I streamed it for 17 hours continuously. The camera may be able to stream indefinitely.
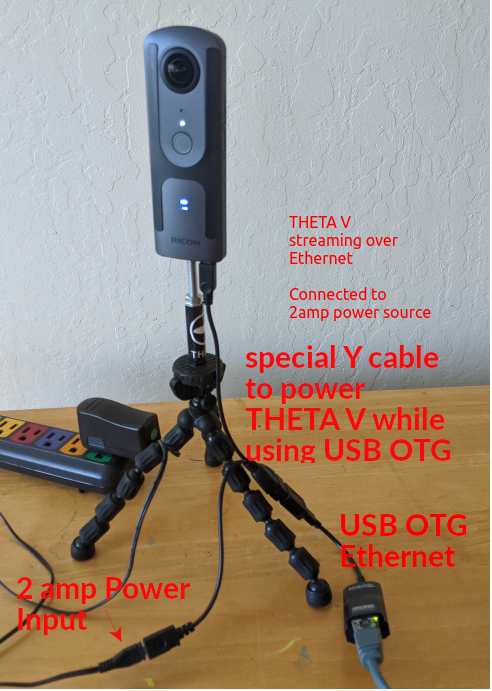
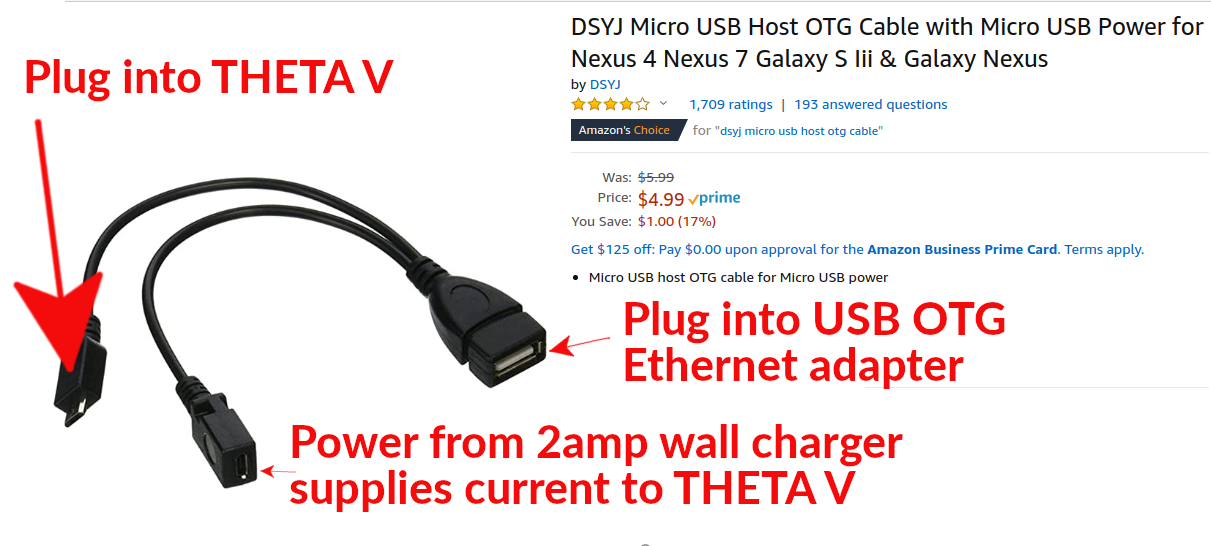
As this was my first time using an USB Y-splitter to power the THETA V while it is connected to a USB OTG device, it took me a long time to figure out which end of the connector to put into what port.
This is the adapter that I am using. I think the adapters are largely similar. Make sure that you get one that indicates it is used to power an Android device (the THETA V) while using a USB OTG device (the Ethernet adaptor).
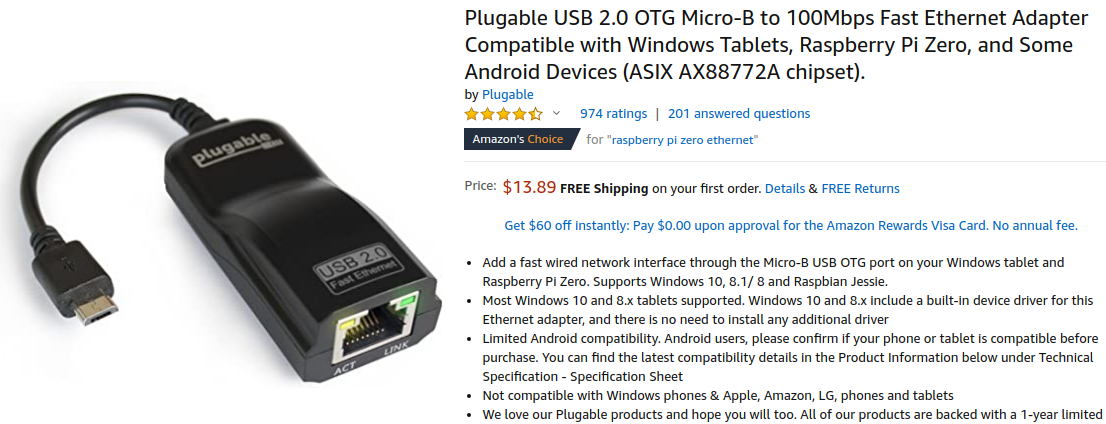
For the USB OTG to Ethernet, I am using the adapter below.
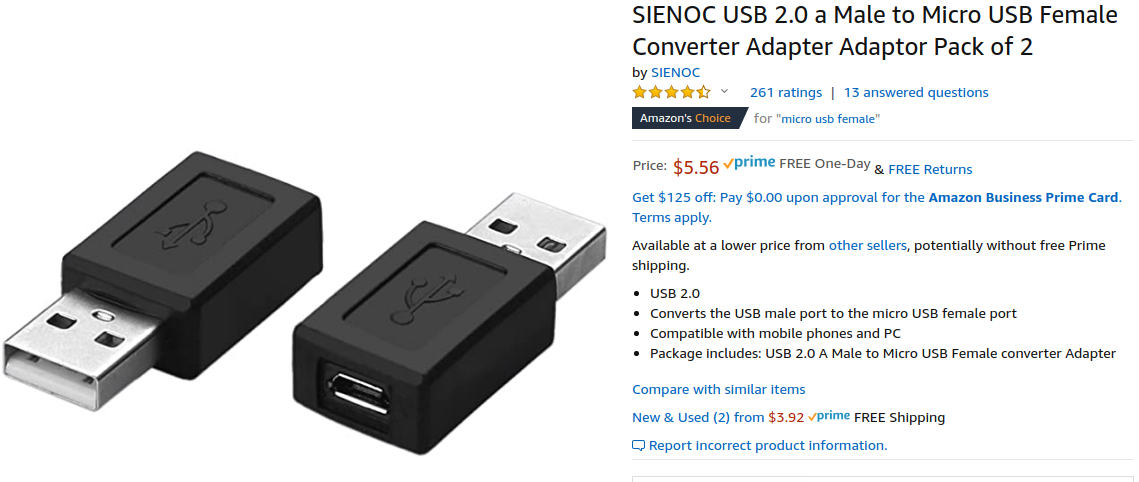
To be able to plug the USB OTG Ethernet adapter into the Y-cable, I needed to buy a microUSB female to USB male adapter.
3.4.1. Troubleshooting the Ethernet Connection
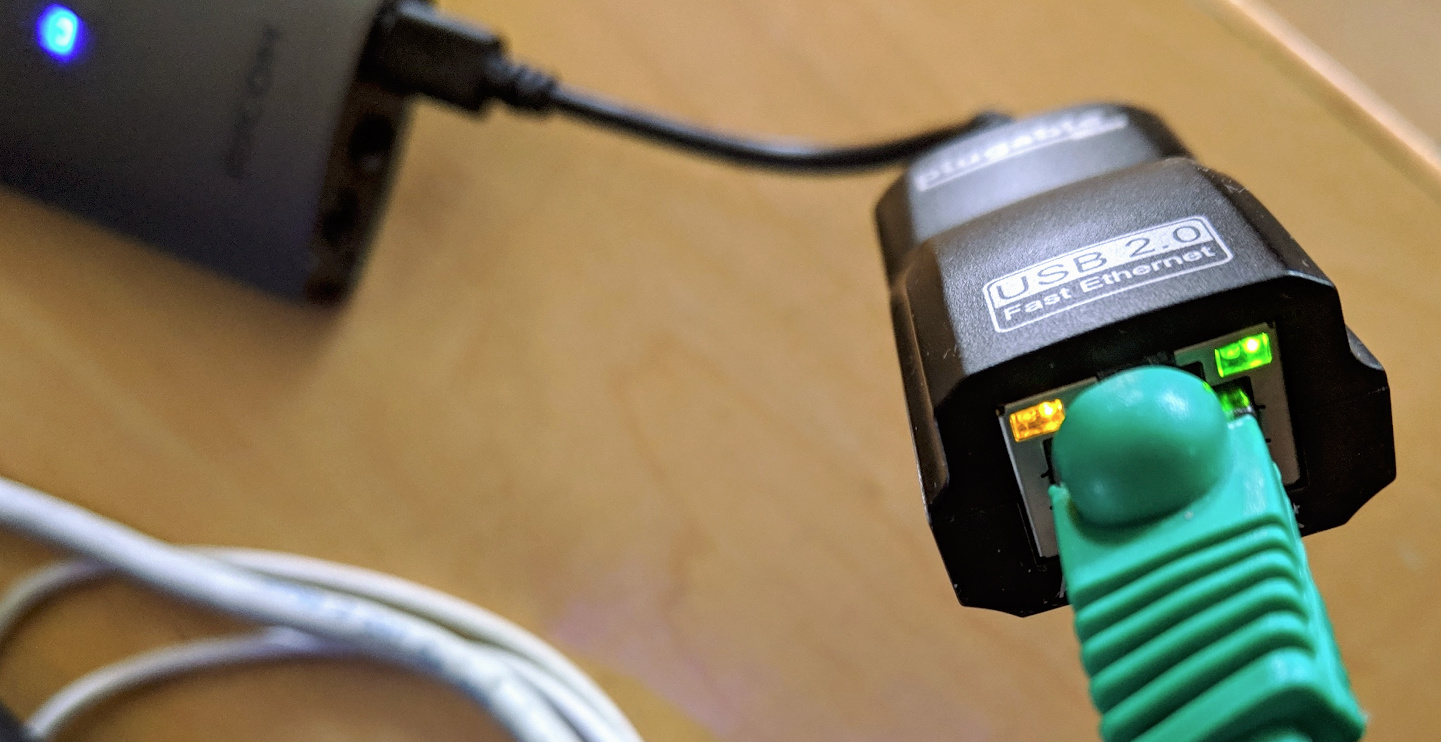
When the THETA V is plugged into Ethernet, both of the LED lights on the USB OTG adapter need to be on.
3.4.2. Other Hacks to Power the Camera
It’s also theoretically possible to bypass the battery, though there have been no supported successed.
3.5. THETA V and Z1 Streaming with a USB Cable
If you are streaming the THETA V or THETA Z1 over a USB cable, you must select a THETA V or THETA Z1 video device on your Mac computer when you use an encoding software such as OBS Studio. On Windows, you can stream directly using MPC-HC or download the THETA V/Z1 live streaming driver. This setup will allow you to stream to YouTube or Facebook.
3.5.1. THETA V/Z1 live streaming OS requirements
-
Windows 10 version 1703 or later
-
macOS Sierra version 10.12.4 or later.
3.5.2. THETA V/Z1 Windows drivers
As of July 7, 2020, the latest Windows 10 driver is version 2.0.
The latest driver is available at https://livestreaming.theta360.guide
3.5.3. THETA V/Z1 driver for macOS
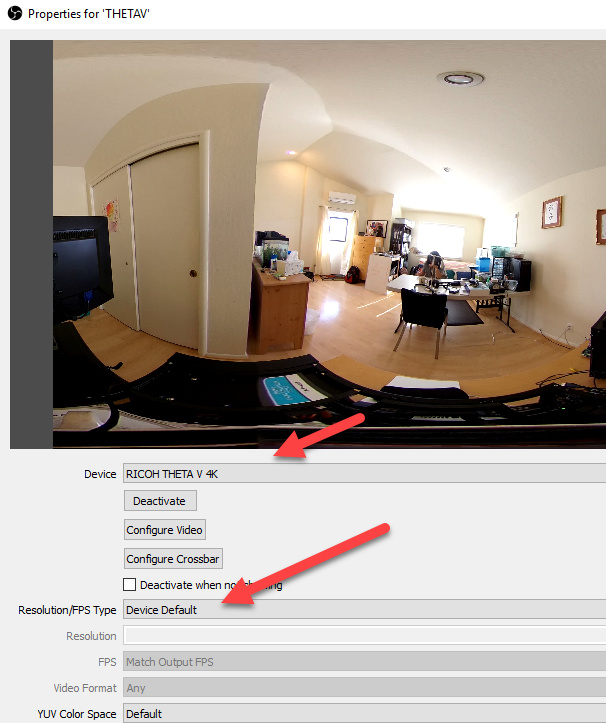
The driver is installed automatically when you connect the camera. Select RICOH THETA V/Z1 in OBS or the encoder software you want to use.
3.5.4. Encoder Software
Example using OBS.
4. THETA V audio
As of September 2018, spatial audio does not work in streaming mode. You can stream single channel audio. Windows computers need build 1709 or later.
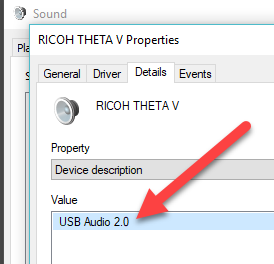
If you have trouble with single channel audio, make sure that you have selected RICOH THETA V as the default microphone when you are streaming.

The audio should be set up automatically. The following screenshot is for troubleshooting. You should not need to set this.
5. RICOH THETA S Software Video Devices
On your Mac or Windows computer, you have three options for THETA webcam devices: RICOH THETA S, THETA UVC HD Blender, THETA UV FullHD Blender. You’re probably wondering what the differences are between the three webcam devices. As of July 2017, this is my understanding of the differences. This is based on the official RICOH specifications. RICOH R Development Kit information was taken from their main site. If this table is in error, please add to the discussion here.
| Driver | Display Format | Image Size and FPS | Streaming Format | USB Standard |
|---|---|---|---|---|
THETA S |
dual-fisheye |
1280x720 @ 15fps |
MotionJPEG |
UVC 1.1 |
THETA S |
dual-fisheye |
1920x1080 @ 30fps with firmware 01.82 |
H.264 |
UVC 1.5 |
THETA UVC HD Blender |
Equirectangular |
1280x720 @ 15fps |
MotionJPEG |
UVC 1.1 |
THETA UVC FullHD Blender |
Equirectangular |
1920x1080 @ 30fps with firmware 01.82 |
H.264 |
UVC 1.5 |
RICOH R Development Kit UVC Capture |
Equirectangular |
1920x960+120 @ 29.97fps |
H.264 |
UVC 1.5 |
| Despite different specifications for the RICOH R and THETA UVC FullHD Blender drivers, I believe that the resolution and fps are the same. |
6. THETA V Live Streaming Mode
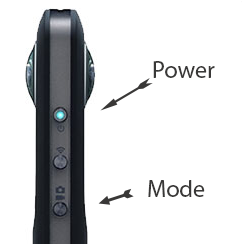
If you are streaming over USB, cycle through the image, video, and live modes by pressing and releasing the lower mode button on the side of the camera.
7. THETA S Live Streaming Mode
With the THETA off, press and hold the mode button. Keep pressing mode and then press power. The camera will go into live streaming mode.
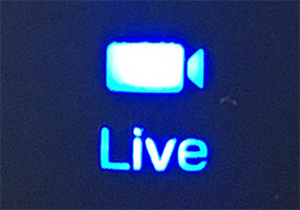
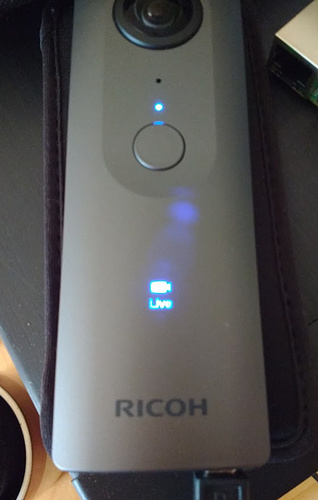
With the camera in live streaming mode, the word Live will appear in blue.
7.1. Connect Camera to Computer
Plug the camera into your computer with a micro USB cable. It will appear as a normal webcam. The camera will be called RICOH THETA S or RICOH THETA V.
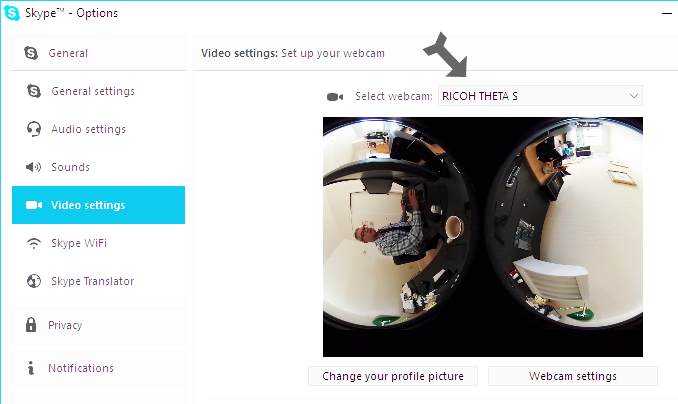
The THETA S will stream in dual-fisheye mode. If you’re using firmware 01.82 or above, the stream is 1920x1080 at 30fps using H.264. Earlier firmware will produce a 1280x720 stream at 15fps
The THETA V will stream in equirectangular mode.
7.2. Install Live Streaming Software
To stream the video to YouTube, install the official RICOH Live-streaming app and OBS.
| Many software can be used to stream to YouTube. Refer to YouTube Live Verified Devices and Software for more information. |
7.2.1. Download and Install RICOH Live-Streaming App
If you are using a RICOH THETA V, see this document.
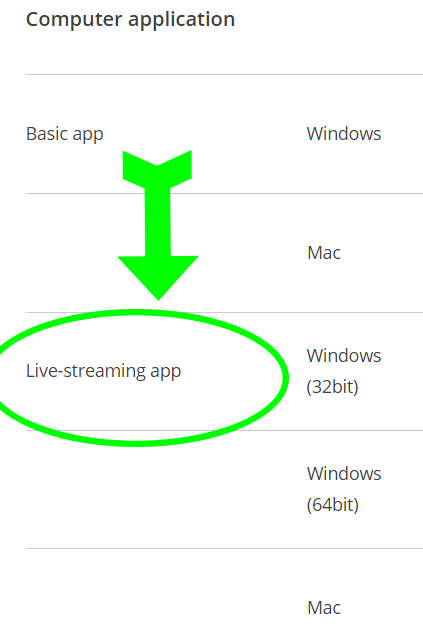
-
Select Windows 32bit, Windows 64bit, or Mac
-
Turn your THETA off
-
Unplug THETA from your computer
-
Install software
With the THETA turned off, the software will prompt you to reconnect the THETA to register your camera.

| RICOH updated UVCBlender to 2.0.0 on November 24, 2016. Official announcement. This was a significant upgrade that enabled full HD at 30 fps with USB. It also moved to USB Video Class (UVC) 1.5. See USB device class specifications. |
After you connect your THETA, a Register button will appear.
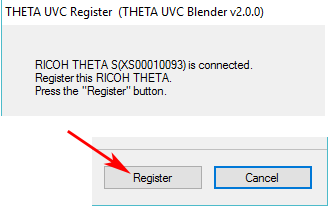
Complete the registration.
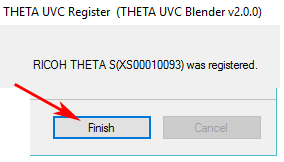
Test the THETA UVC FullHD Blender driver with any software that works with a webcam. In the example below, I am using Skype.
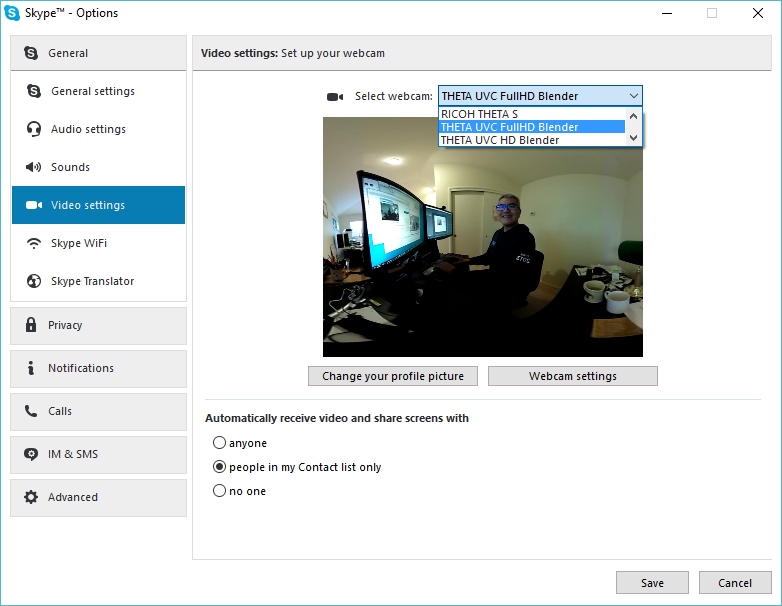
| In Skype, the video does not have 360° navigation (as of Jan 2017) and it will look like a distorted rectangle. Skype is for testing only, not for use. |
You can also test it with other software such as OBS if you already have it installed.
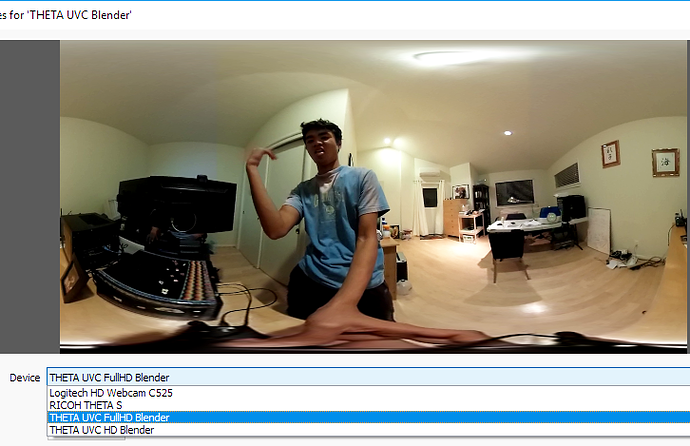
| Make sure you select THETA UVC FullHD Blender and not RICOH THETA S. |
8. RICOH R Development Kit
This section refers to the RICOH R Development Kit. If you have a THETA S, ignore this section.
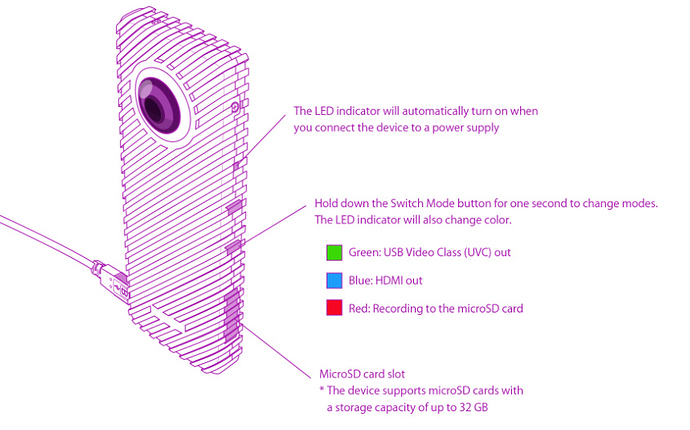
The RICOH R Development Kit boots into HDMI out mode when you power it on. To use the unit on your desktop, you need to change it from HDMI mode to USB output mode.
8.1. Set to USB out
If the top LED on the side is blue, change it to green by pressing the bottom button. Each press should be 1 second.

8.2. Install USB Driver
You only need this software for USB live streaming with the RICOH R Dev Kit. If you are using HDMI or have a THETA S, you can skip this section. Download the ricoh-r-dk-uvc-capture application from GitHub.

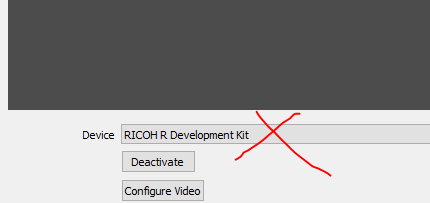
| Make sure you select RICOH R Development Kit UVC Capture and not RICOH R Development Kit. |
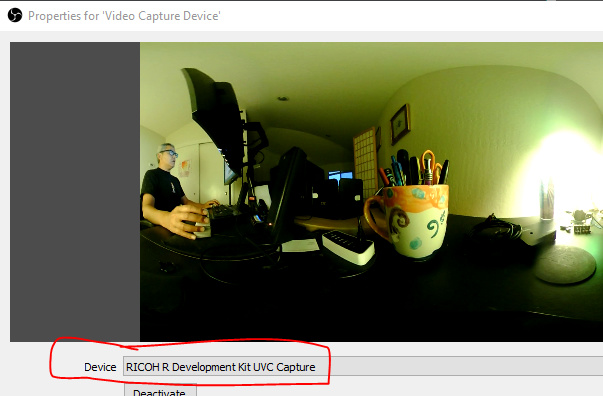
If you select the wrong driver, you will not get a video stream.
9. Configure Computer To Stream to Internet
Download and install OBS.
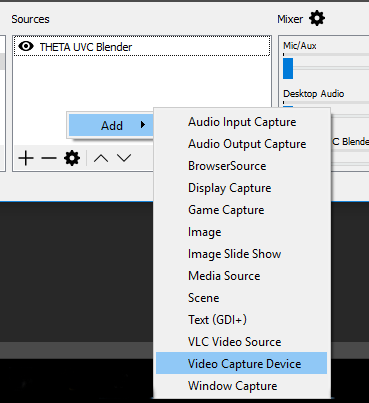
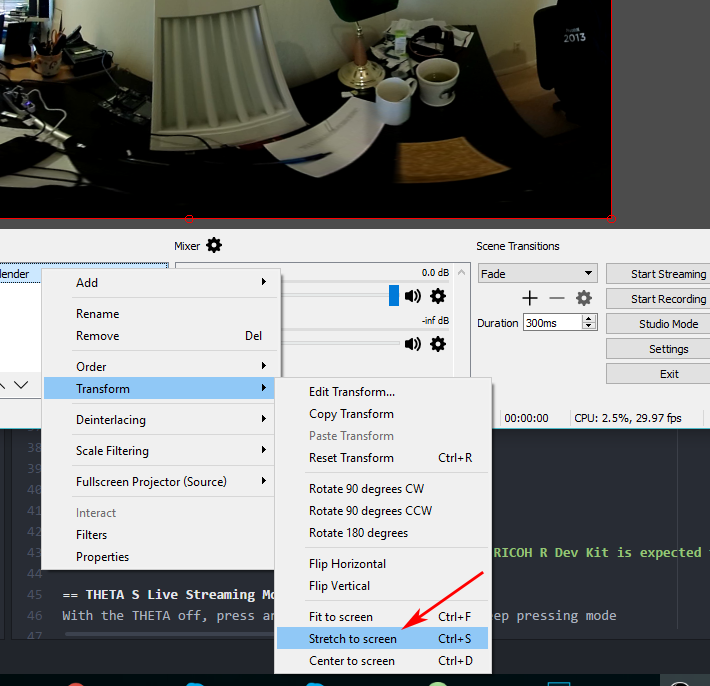
Create a new Scene. Any name is fine. Click on the plus sign. Under Sources, add THETA Full HD UVC Blender (any name is fine) and add a video capture device. Right click to open the pop-up menu.
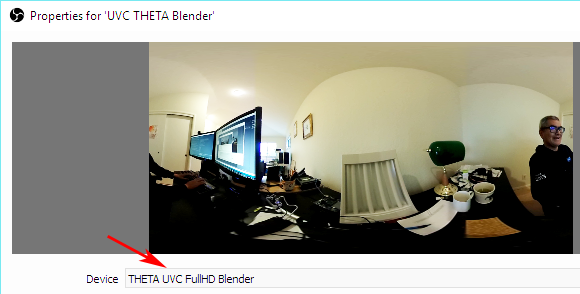
Select THETA UVC Blender as the Device. Verify that the video stream is in equirectangular format.
If you see this message, the camera is not connected properly. Go to the troubleshooting section or read the tip below. image::img/livestreaming/error-message.png[role="thumb" title="Error message when camera not detected"]
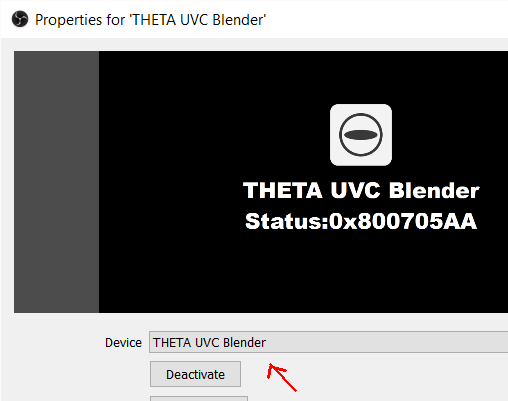
| If you see a black screen that says Status:0x800705AA, try to toggle your device between your two webcams. If you still see the error, disconnect all other webcams or disable the webcam on your laptop and then reboot your computer. The error above indicates that a connection is not established. See Troubleshooting section below |
Leave the Resolution/FPS Type as Device Default.

Under Settings → Video, set the resolution to 1920x1080 at 29.97fps (30fps will also work).
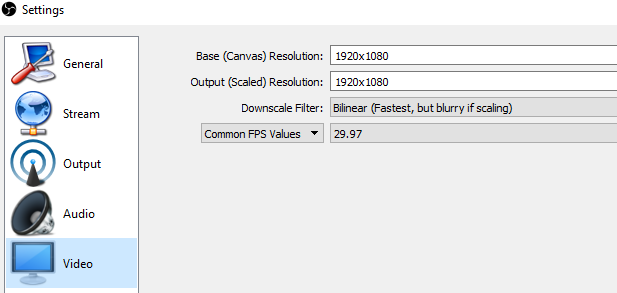
| In November of 2016, the maximum resolution for UVC Blender got upgraded to 1080p from 720. You need the latest driver and firmware to achieve the higher resolution. |
Select Stretch to screen.
10. Create a YouTube Live 360° Event
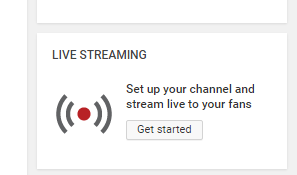
Log into YouTube. Click on the Upload button. Click the Get started button on live streaming.
Select Events.
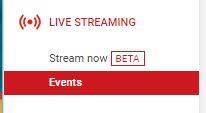
| Make sure you select Events. You will not get a 360° stream with Stream now. |
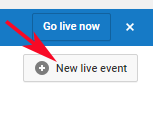
In the right side of the screen, select New live event.
Add a title.
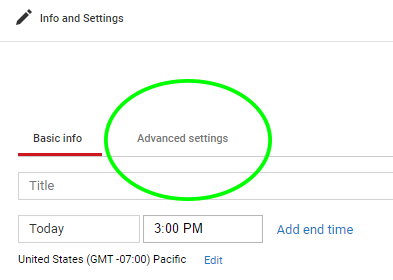
Select Advanced Settings
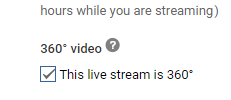
Select This live stream is 360.
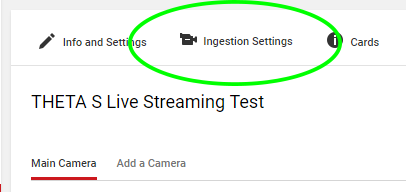
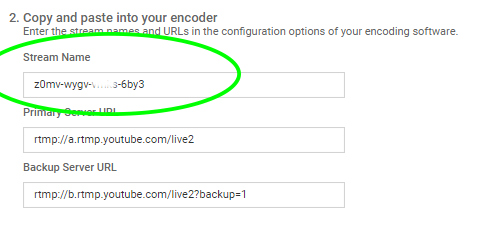
Create the event. On the next screen, grab stream name from Ingestion Settings
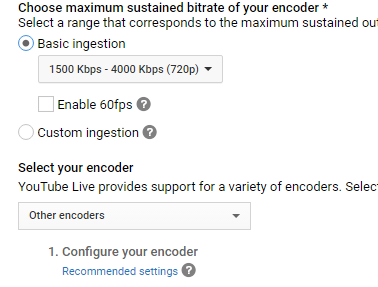
Once you click on Basic ingestion information on your encoder will open up. Set your bandwidth to the highest value your network can support. In the example below, I have it set to 720p as I have only 1.5Mbps upstream at my house.
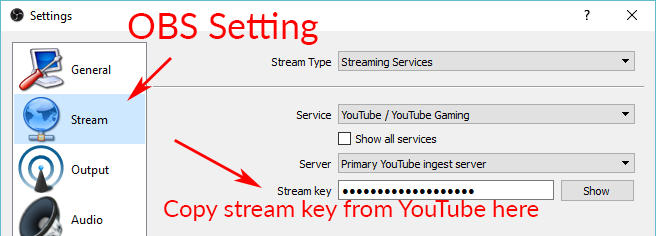
Copy the stream name. You will need this for OBS. In OBS, it is called, Stream key.
Open OBS, go to Settings → Stream. Paste the YouTube stream name into the box on OBS called, Stream key.
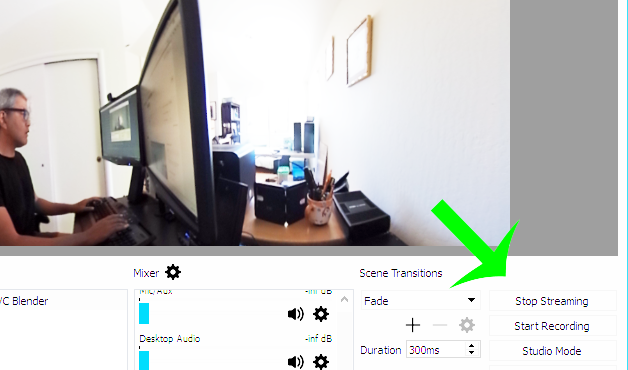
On the main OBS front control panel, press Start Streaming in the right hand side of the control panel.
On YouTube, go to the Live Control Room and click Preview Stream.
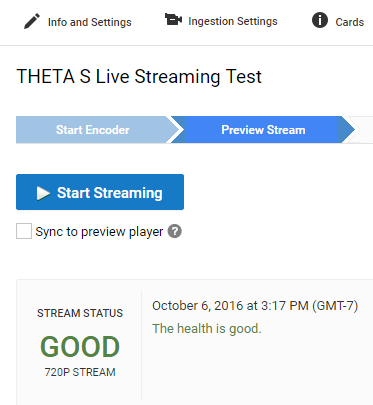
You can preview the stream if you have good bandwidth. I have limited upstream bandwidth in my office. I reduced the ingestion bandwidth, making my resolution lower. Navigation in 360 works fine. My resolution is limited by my 1.5Mbps upload bandwidth.
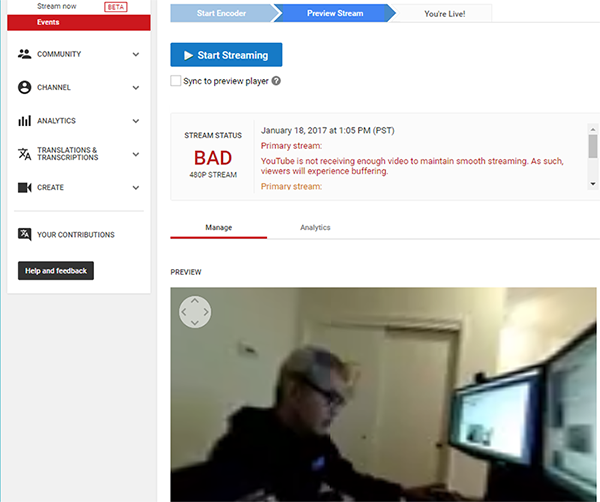
When you’re ready, start the stream.
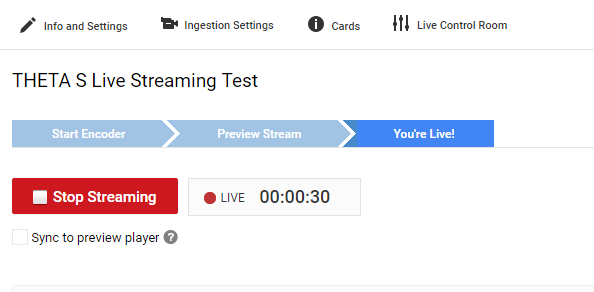
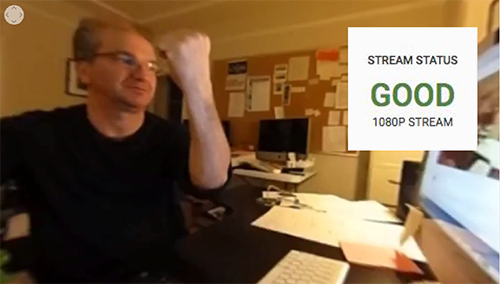
This is an example of the THETA S streamed to YouTube with faster bandwidth.
This is a screenshot from the live stream of the RICOH R Development Kit from their demo at CES in January of 2017.
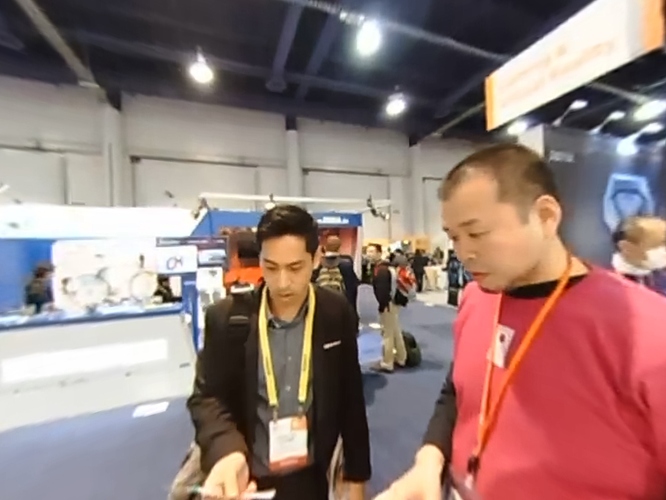
The RICOH R Dev Kit was plugged into LiveShell at the event. For information on using HDMI output to stream with a Teradek VidiU, which is similar to LiveShell, read the article YouTube 360 Live Streaming with the RICOH R Dev Kit and Teradek VidiU
11. Facebook Live 360° Event
We are working on a separate guide for Facebook Live 360 with RICOH THETA S. See unoffical forum for updates.
What We’re Doing
We’re using a RICOH THETA S to live stream 360 events to Facebook Live 360. The live 360 events can be viewed in VR headsets, on a mobile phone, or in a web browser.
What You Need
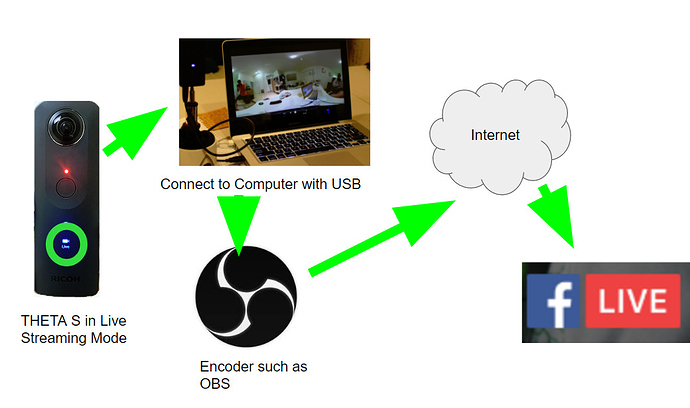
Process
-
Set up UVC FullHD Blender. We’re assuming that you have the THETA working with THETA UVC FullHD Blender in live streaming mode. If you do not, refer to the live streaming guide for detailed instruction.
-
Set up Facebook Live 360
-
Configure OBS with information from Facebook Live 360 event
-
Stream from OBS to Facebook Live
-
From FB Live, stream the event to your audience
Configure Facebook Live
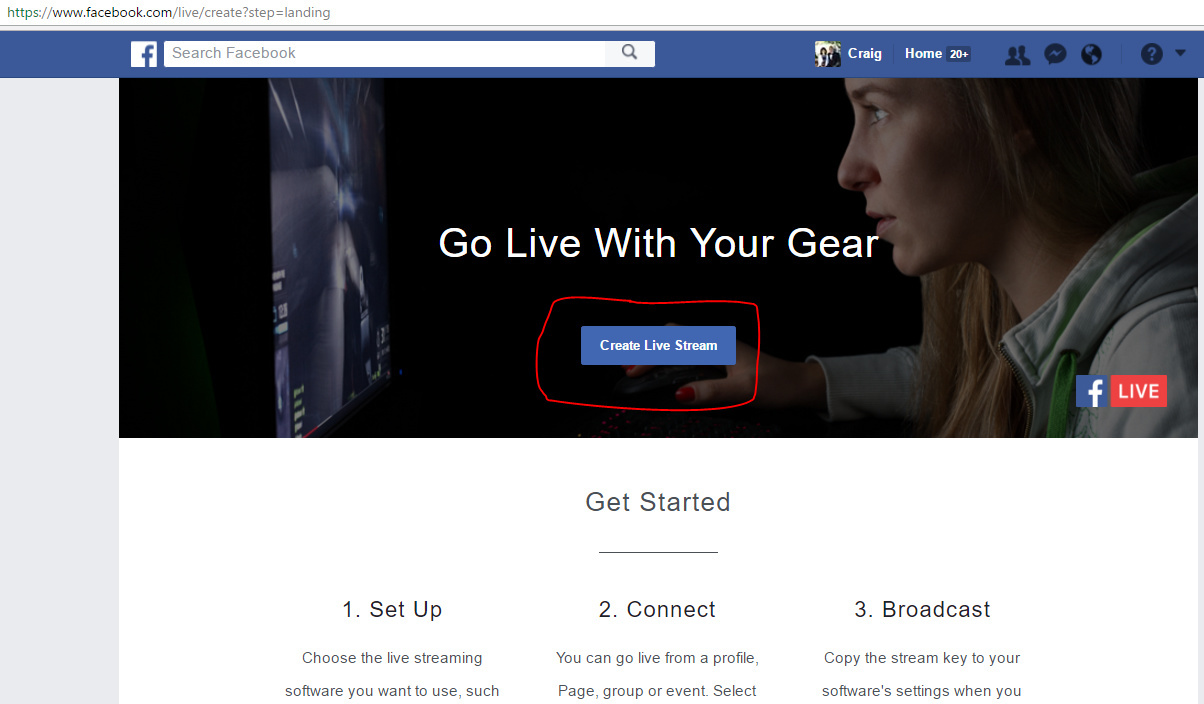
Click on Create Live Stream
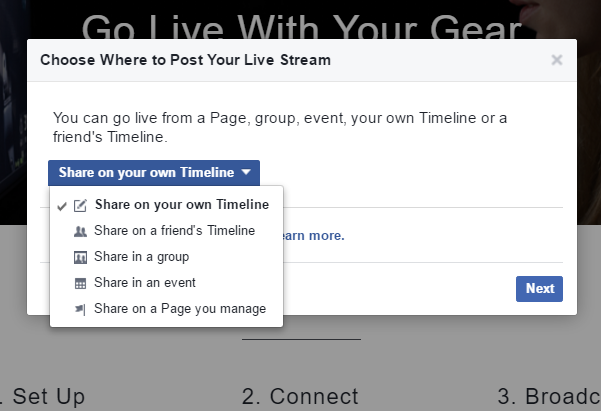
Select Location to Post
Show on your own timeline, a group, create an event, or broadcast to a page you manage.
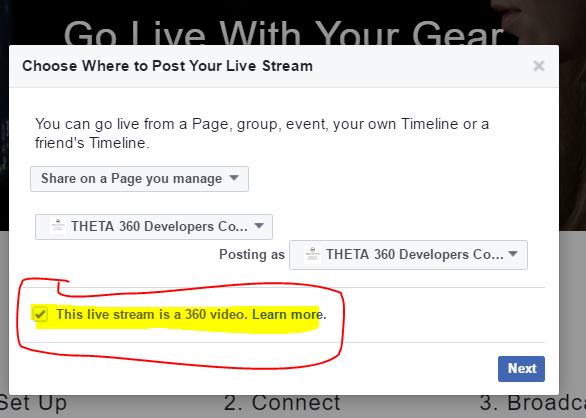
Select 360 video
Make sure you check, This live stream is a 360 video
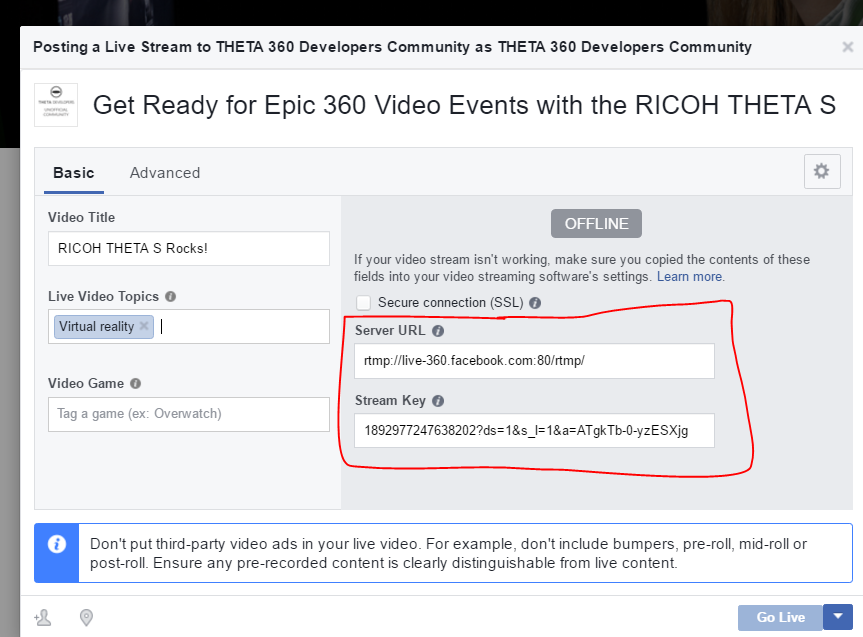
Get Streaming Information
On Facebook, get the Server URL and Stream Key
Configure OBS
Create Source
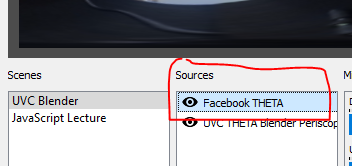
Configuration Overview
-
Target Resolution: 1080p at 2:1 aspect ratio (1920x960) • Frame Rate: 30fps
-
Target bitrate: 4 Mbps (megabits)
-
Keyframe frequency: 1 I-frame every 2 seconds (minimum) • Audio: AAC
-
Audio Sample Rate: 44.1 KHz
-
Audio Bitrate: 128 Kbps (kilobits)
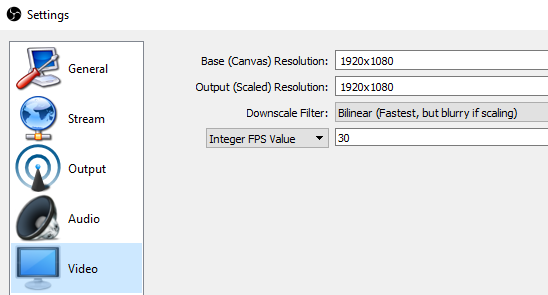
Configure Video
-
Device: THETA UVC FullHD Blender
-
Resolution: 1920x1080 (if using driver above)
-
FPS: Match Output FPS (which is 30 fps)

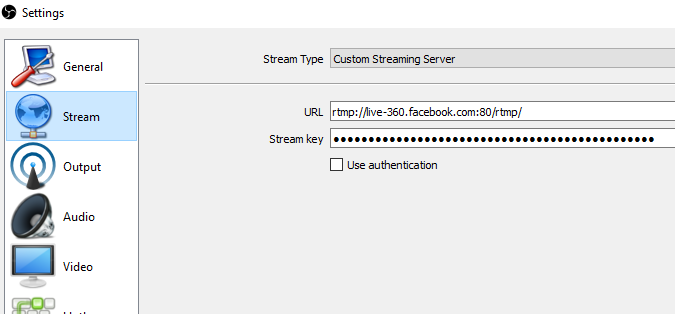
OBS Settings
Under Settings → Stream
Settings → Video
Preview Live Stream on OBS
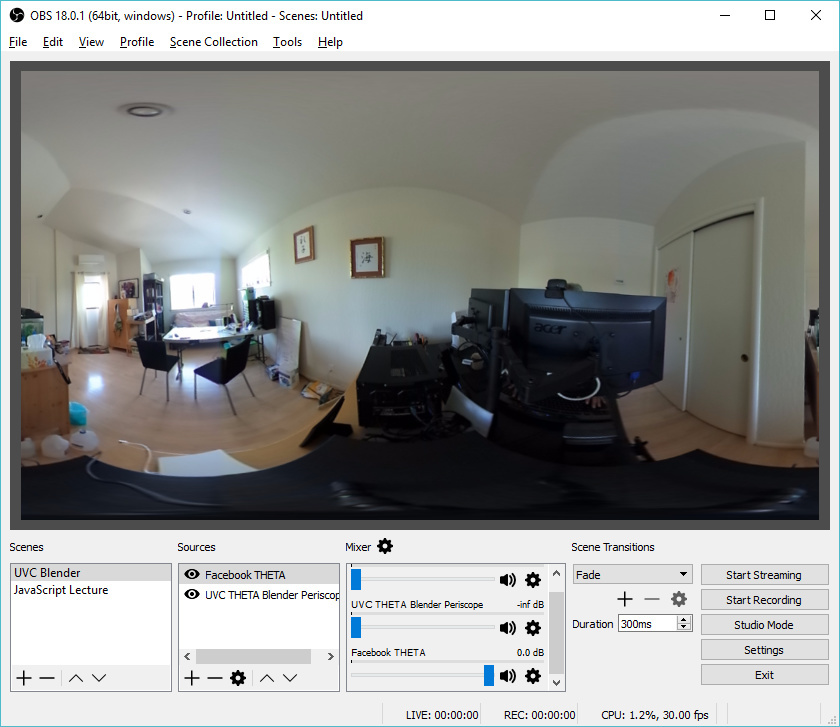
If you don’t see an equirectangular stream that is similar to image above, go to the Troubleshooting section.
Start Stream on OBS
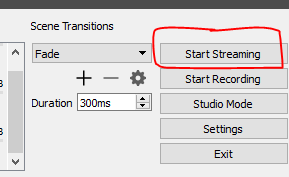
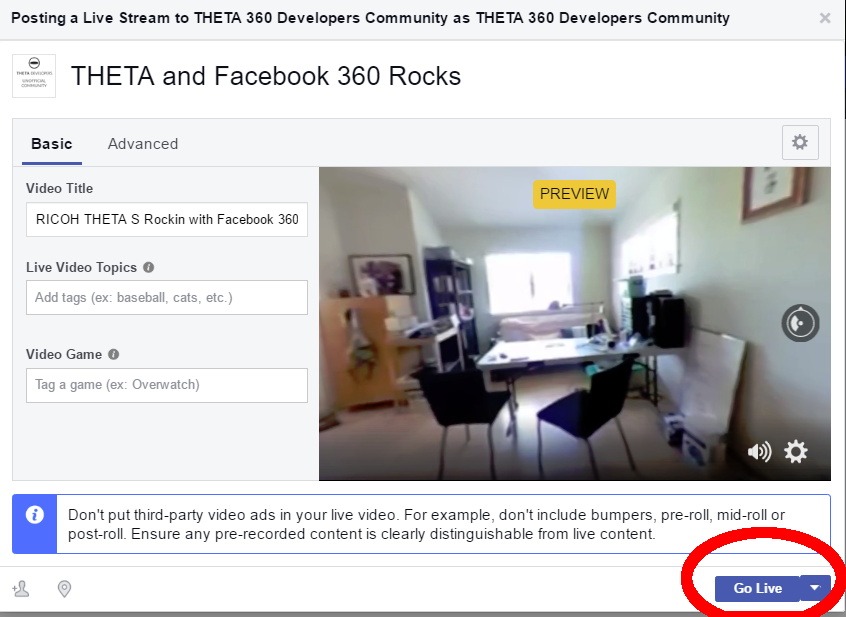
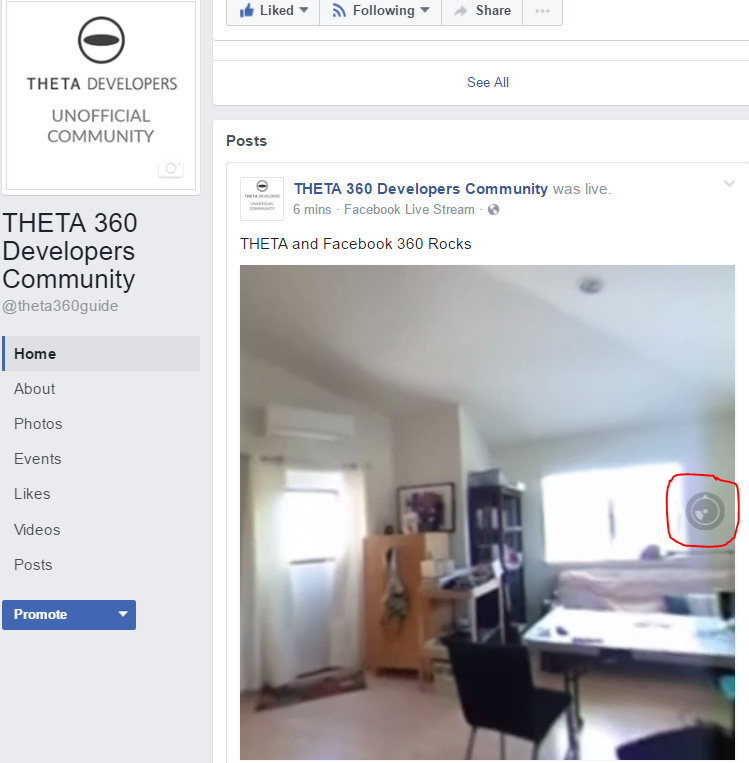
Go Live 360 Broadcast on Facebook
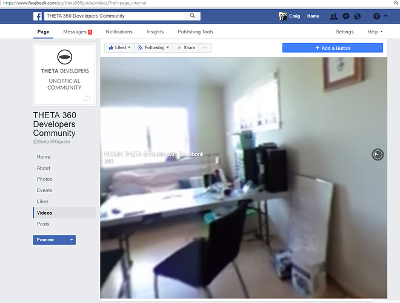
View Live on Facebook
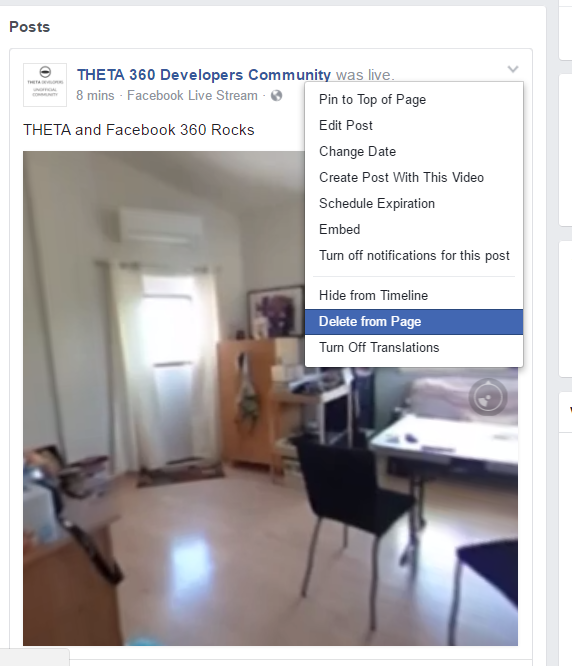
Automatically Promote Saved Event on Facebook Timeline
Adjust Sharing, Expiration or Delete
12. Using HDMI
Using USB output for live streaming, you will get a maximum resolution of 1080p. This is the same resolution as saving video files to your camera. If you save still images as timelapse, you can get 5376x2688, which will be displayed as 4K on YouTube.
The THETA S has an HDMI port that can output 1920x1080 at 30fps. Until November 2016, this resolution was higher than the USB port. People were using the HDMI to get higher resolution.
In order to use this signal, you need to use something like Blackmagicdesign UltraStudio for Thunderbolt.
Once you get the video stream onto your computer, it will be in dual-fisheye. Although I have not tested it, you can may be able to use THETA UVC FullHD Blender to get this into equirectangular. With the previous driver, this was definitely not possible. If you test it and get it to work, let me know.
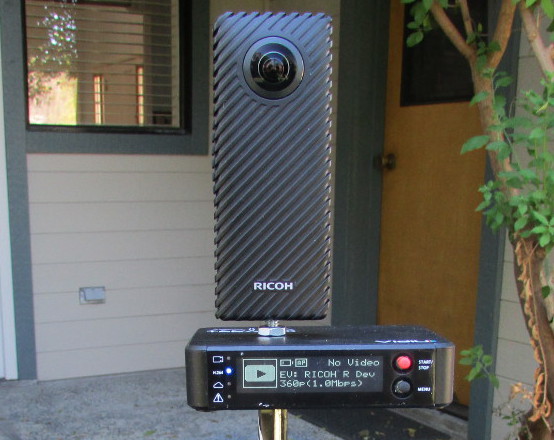
It’s possible to use the RICOH R Development Kit to output equirectangular directly from HDMI and connect it to a device like VidiU (tested) or Blackmagic (not tested). See this article for more information on the RICOH R Development Kit.
There are third-party products such as Streambox Cloud Encoder or MimoLive.
12.1. Streambox
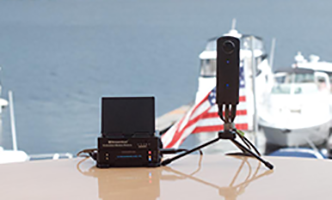
This is the workflow.

This is a sample of the live stream using a THETA.
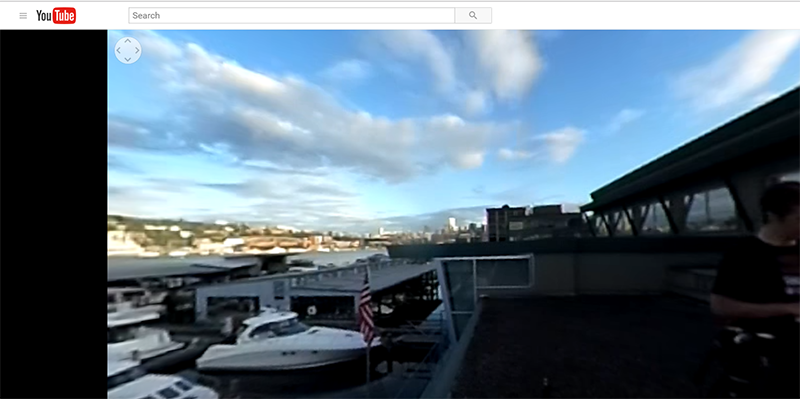
This is the equipment and service list used:
-
Streamed live using Streambox Cloud Encoder
-
RICOH THETA S Camera
-
BlackMagic UltraStudio Mini Recorder
-
MacBook Pro with USB Modems
-
Streambox Cloud
12.2. mimoLive
Boinx Software offers mimoLive.
They have a good video that provides an overview of their service specifically for the THETA S.
mimoLive can accept a USB or HDMI stream in dual-fisheye.
In order to use the HDMI output from the THETA, you will need a HDMI video grabber. Boinx Software recommends the Blackmagic Design UltraStudio Mini Recorder for Thunderbolt or the Magewell USB Capture HDMI adapter for USB 3.
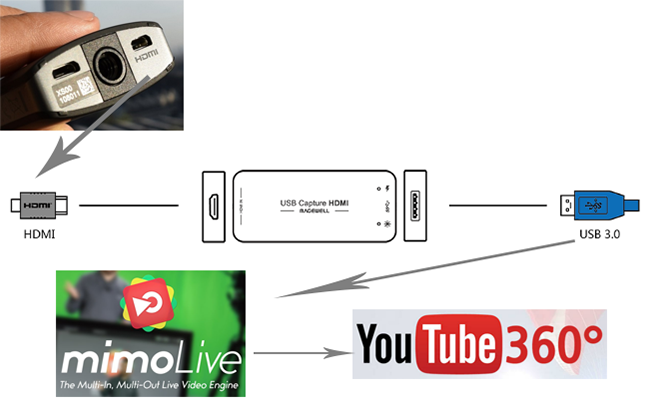
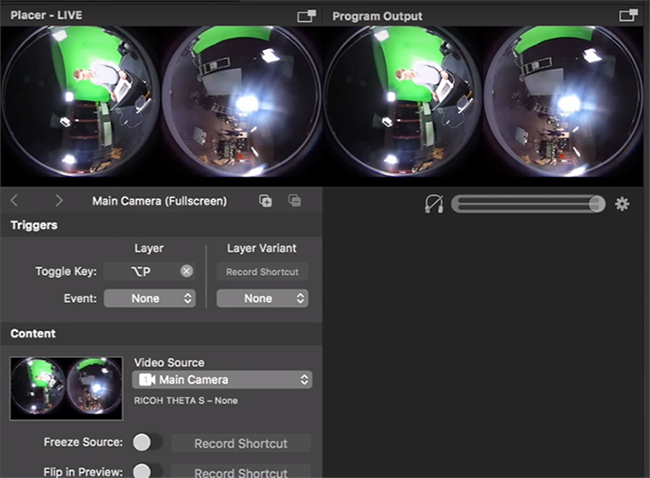
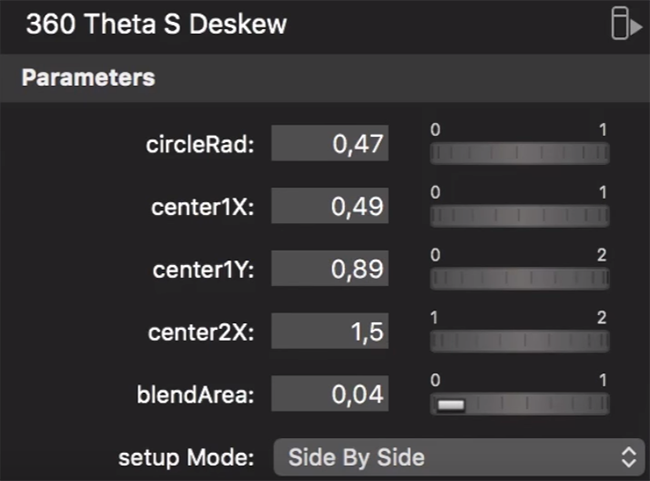
mimoLive can take the THETA S dual-fisheye video stream source and apply a filter convert it to equirectangular for streaming to places like YouTube Live 360 events.
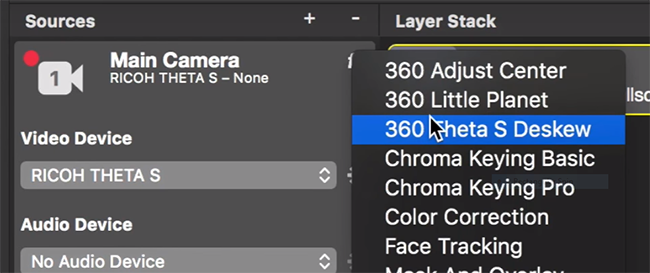
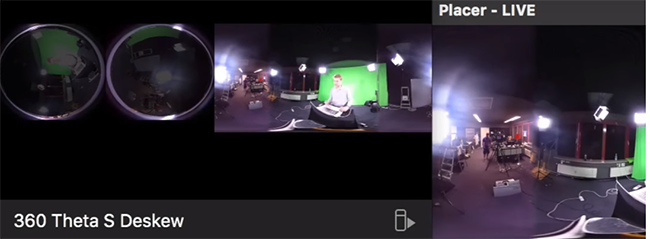
mimoLive provides sliders to adjust the sphere stitching. You’ll only be able to get a good enough stitch. The edges of the spheres will not match perfectly.
This is an example of the 360 live stream. The quality of the stitch is good.
Even if you are using USB output, you still may want to use mimoLive instead of the free RICOH THETA UVC Blender app to take advantage of mimoLive features to add text, Twitter, and slides into the YouTube live streaming event.
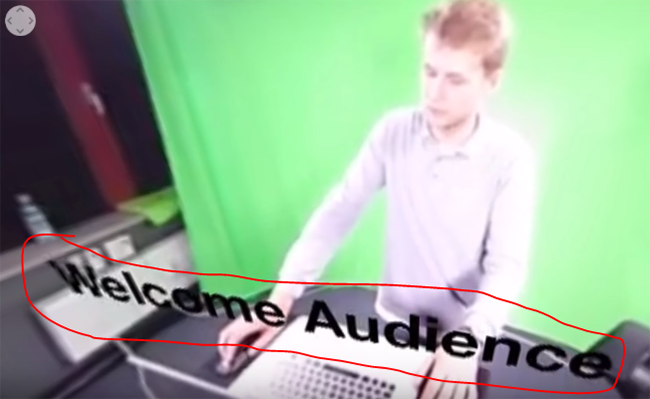


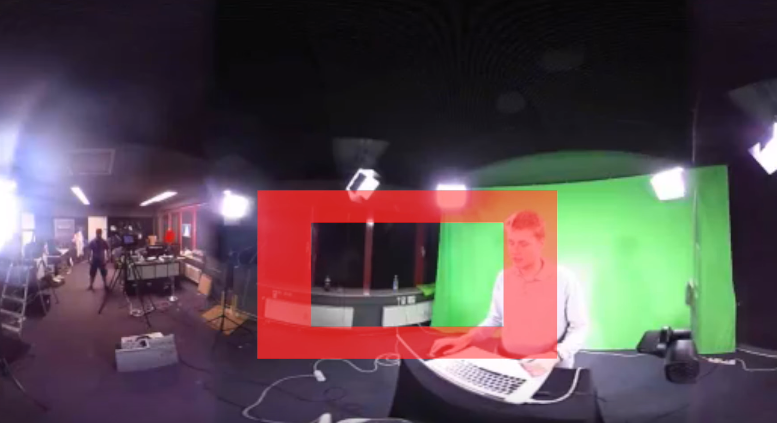
You can also center your video stream.
12.3. RICOH R Dev Kit
The RICOH R Dev Kit can output equirectangular streaming video in Full HD, 59.94i. An overview of using the RICOH R Dev Kit with HDMI is available in this article.
12.4. Other
Videostream360 offers a service to use THETA at 1920x1080 with HDMI. They even sell the THETA on their site.
If you have a solution for HDMI 360° streaming and you’ve verified that it works with the THETA, please join the THETA Ecosystem and post information about it.
13. Problems with VLC 3.0.0
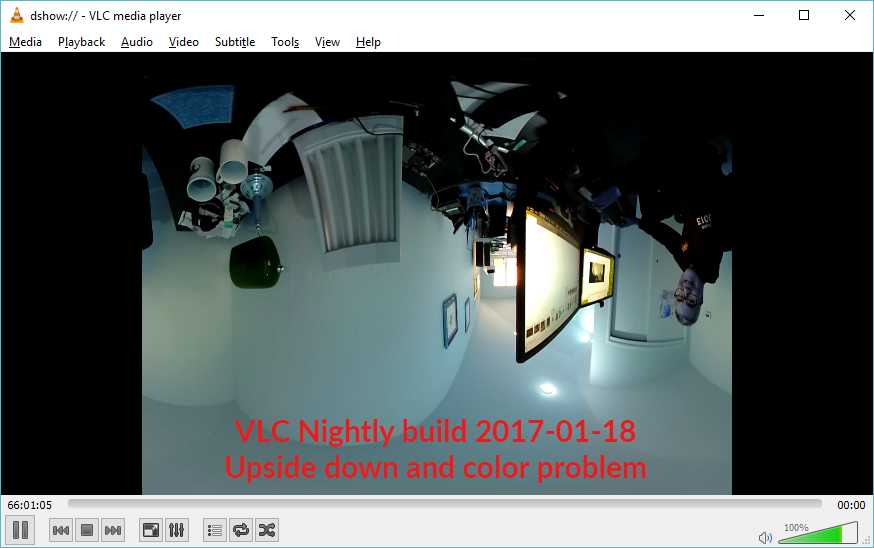
VLC 3.0.0 is currently not released. As of July 21, 2017, nightly builds will not play the THETA stream correctly. The stream is upside down and the color is off.
14. Tethered Streaming with Unity
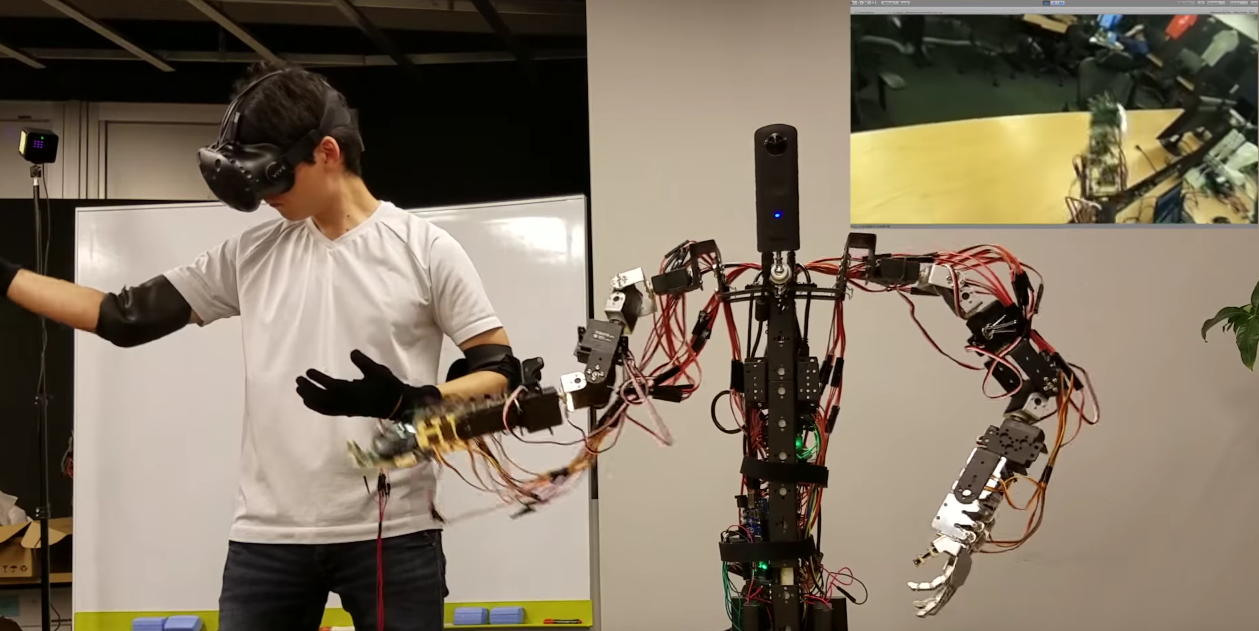
Example above built by GITAI.
Technical information on the GITAI example originally found here in Japanese.
-
Language: HTML/CSS, Javascript, Java, C, C++, C#, PHP
-
Database: MySQL
-
Library: Three.js, A-Frame
-
Tools: Unity
-
Network: Photon, Serial, UDP
-
PaaS: AWS, Heroku, milkcocoa
-
Others: NodeJS, Socket.io, GitHub, Arduino
14.1. THETA V and Unity
The THETA V is easier to work with as it outputs a stitched equirectangular stream that you can use directly as a webcam texture in Unity. Just drop it onto a sphere.
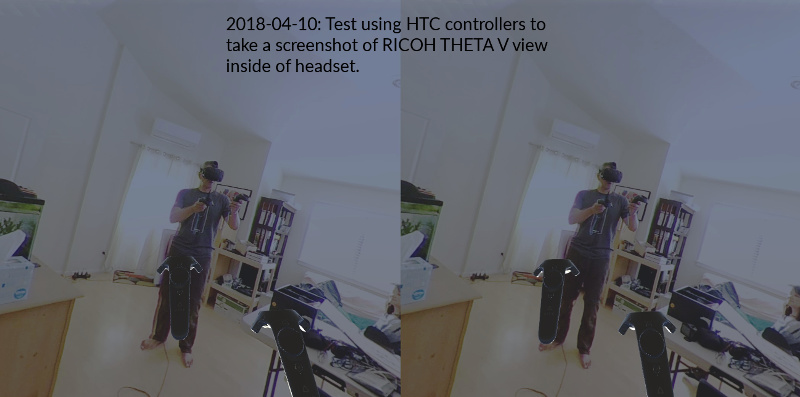
14.1.1. Overview
The RICOH THETA is the world’s most popular 360 camera. The THETA V model was released in late 2017. The “V” outputs a 4K equirectangular video stream with H264 compression 3840×1920/29.97fps as well as a 2K 1920x960/29.97 stream.
You can easily use a Unity webcam texture to wrap the THETA V 4K video stream onto a sphere to provide a telepresence experience for industrial or experiential applications.
This test application illustrates the following techniques:
-
identify THETA V camera inside of Unity
-
assign THETA V to a texture
-
use flip normals on a Blender sphere to display the webcam texture to the inside of the Sphere. The Blender sphere is imported into Unity
-
use negative scale values to solve mirroring problem of objects in sphere appearing in reverse
-
display THETA V stream inside of a HTC Vive headset with SteamVR
-
track head movements and controller movements with SteamVR
-
use THETA V as a microphone and output audio to HTC Vive
-
initial configuration tests to orient the headset and the camera to simulate real-world telepresence
These techniques are compiled from the theta360.guide community in the Unity Development discussion conference.

14.1.2. Software Used in This Test
-
RICOH THETA V firmware 2.11.1 (or higher)
-
RICOH THETA V live streaming driver 1.0.1 64 bit - You NEED 1.0.1 or higher to work with Unity
-
Unity 2017.4.0f1 (earlier version should work)
-
SteamVR

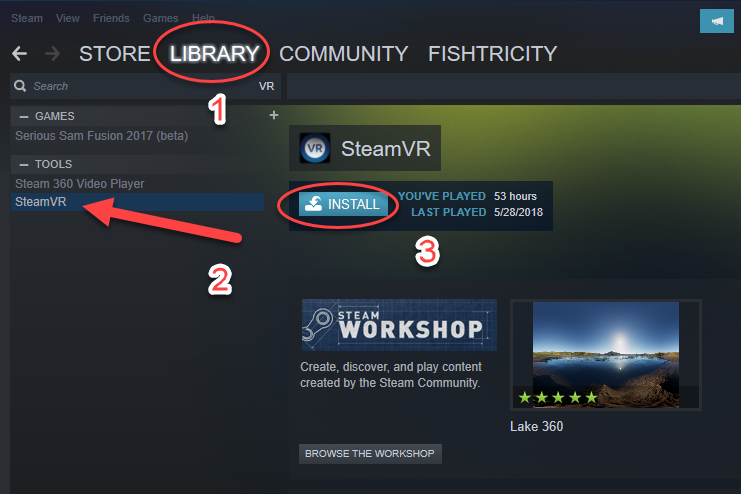
You need to have Steam and SteamVR installed.
14.1.3. Using the Developer Package
Developers can download the Unity Package with all source code and settings
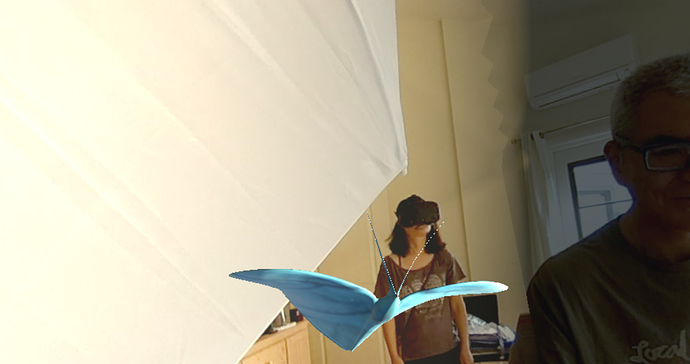
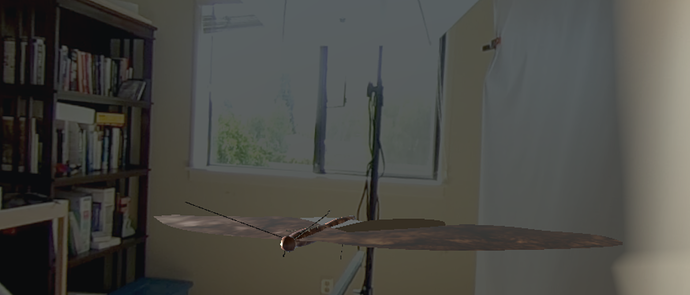
| The package contains two simple 3D assets in the scene to illustrate how to import a 3D model. There are two basic moths that are stationary in different lighting areas. |
14.1.4. Turn on THETA V in Live Streaming Mode
To simulate the perspective a standing person, put the THETA V on a tripod at eye level. Connect the THETA V with a USB cable and put it into live streaming mode.
14.1.5. Connect HTC Vive to Your Computer

14.1.6. Align Camera and Headset
The HTC Vive default position is pointed in the same direction as the rear THETA V camera lense. The rear lense is the one that is facing away from the shutter button. A person talking directly to the rear lense will appear to be talking to the face of the person wearing the HTC Vive headset.

14.1.7. Start SteamVR
image::img/livestreaming/unity/thetav/vive/steamvr.png[role="thumb" title="SteamVR on Windows 10
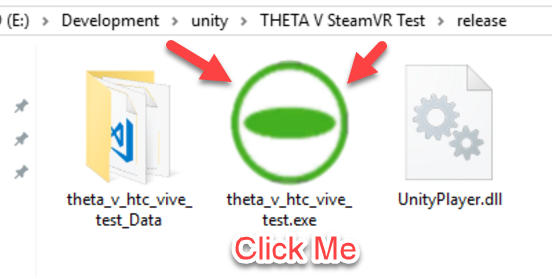
14.1.8. Start Application on Windows
14.1.9. Wait for App to Load
The app should load in less than 5 seconds. The headset screen will turn black as the headset adjusts to the THETA V input.

14.1.10. Success
Congratulations. You’ve just completed the test.

If you’d like to modify the code, read on.
14.1.11. Audio
The script will use the first audio device it finds. Adjust this line in the code to properly identify the THETA V. The script will display the connected microphones to the debug console of Unity.
public const int THETA_V_AUDIO_NUMBER = 0;
14.1.12. Viewing Inside of Sphere
I am using a flip-normals sphere that I created in blender. This should be included in the package.
If you’re interested in building your own sphere with Blender, this video will give you a step-by-step process.

14.1.13. Mirroring
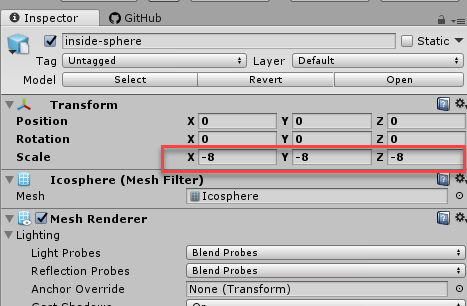
The flip-normals sphere causing the scene to appear like a mirror image. To correct this problem, I am inverting the sphere with negative scale. -8, -8, -8.
14.1.14. Inverted Camera
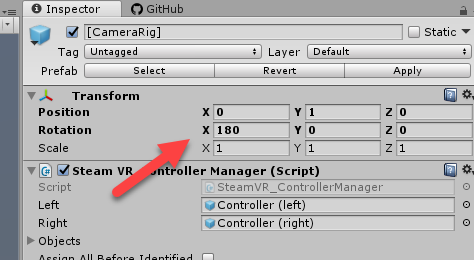
I needed to rotate the X axis of the SteamVR rig by 180 degrees in order to get it to work.
14.2. THETA S and Unity
There are three techniques to live stream from the THETA S into a Unity application.
-
SteamVR with manual stitch adjustment. Uses RICOH THETA S driver.
-
Generic Unity application with manual stitch adjustment. Uses RICOH THETA S driver.
-
UVC FullHD Blender with registry hack. Uses THETA UVC FullHD Blender driver.
14.2.1. Manual Stitching
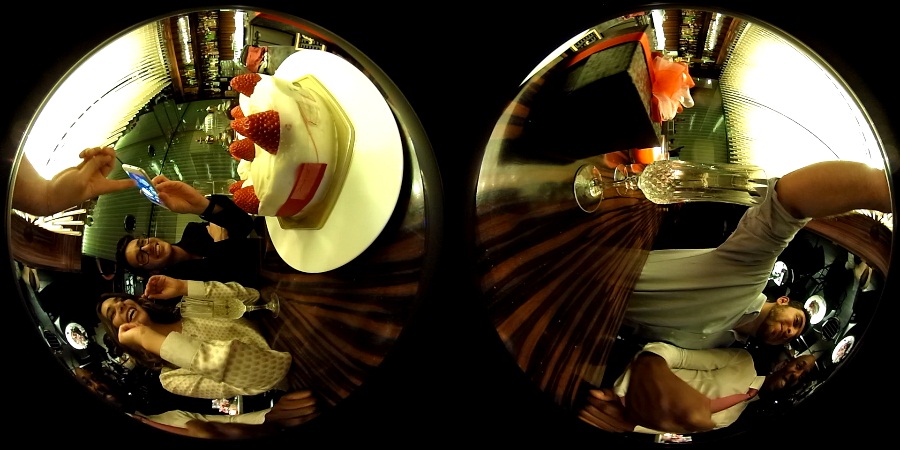
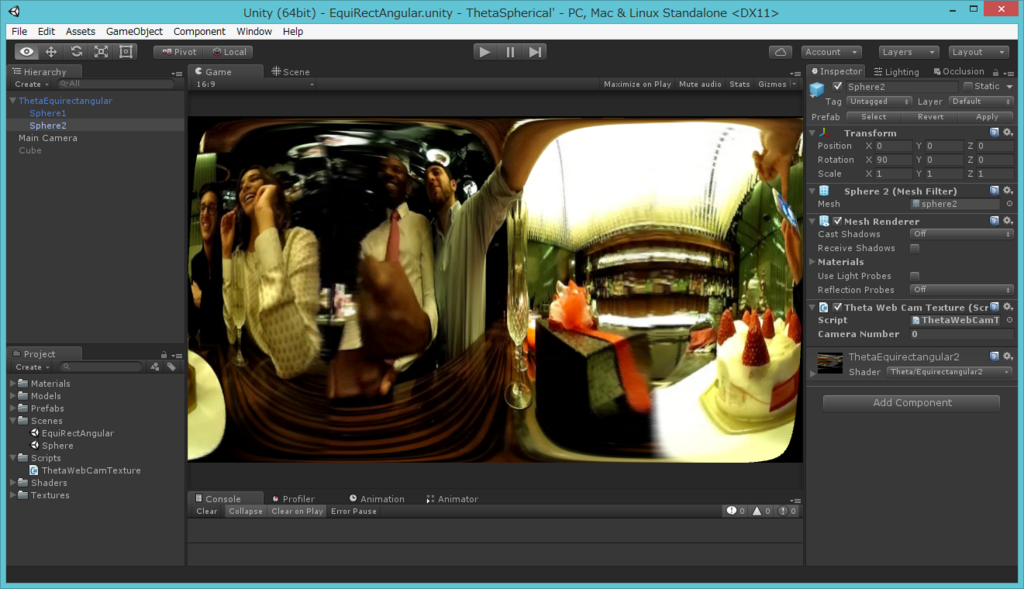
Most people start with this set of templates and code. This technique involves using the THETA S webcam driver, not UVC Blender. It explains how to go from dual-fisheye to a single sphere.
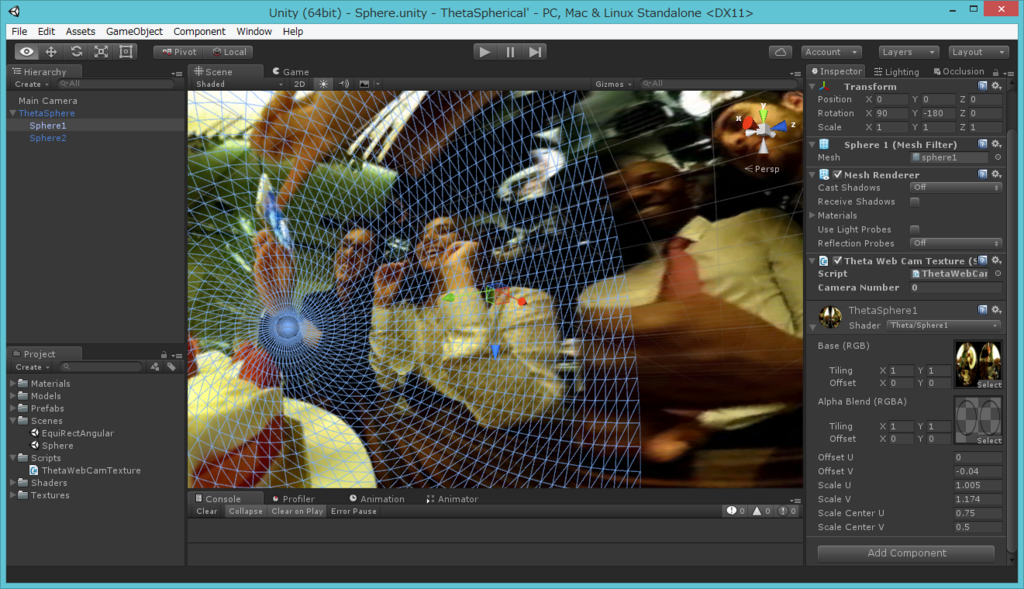
Problems
People encounter two problems with the tutorial above.
-
There’s only a single camera on half the sphere. (you need to add a second camera)
-
There’s a gap in the sphere that requires manual blender (one time only)
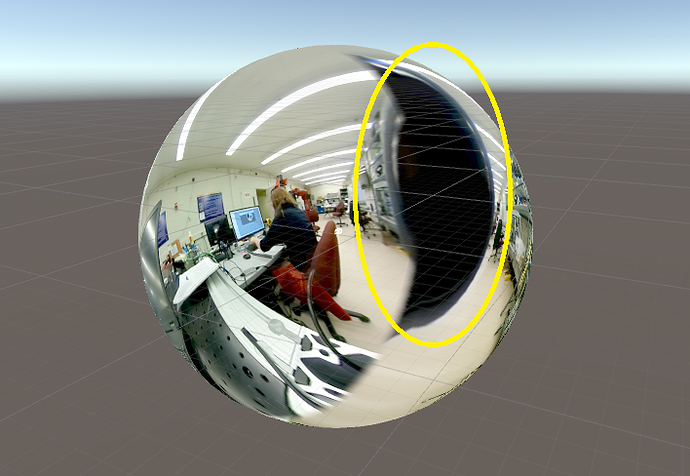
This note from Megan Zimmerman explains the issue.
"" The dual projection is implied in Hecomi’s post as he adds the camera feed script to both spheres for their equirectangular solution. In the Tanyuan solution, you have equirectangular already and are projecting one feed onto one sphere, because we are using two spheres we project onto both.
Personally, when I started working on this solution I got caught up in Hecomi’s solution because its harder to understand what is going on if you don’t do it yourself step by step. This has me thinking that I should probably make my own shader from scratch, because while I get the idea of what the shader is doing, I want to understand how. ""
There are different ways to adjust the projection on the sphere to get rid of the gap. Manual adjustment is common.
Sphere1:
Offset U: 0.013
Offset V: 0.007
Scale U: 0.983
Scale V: 1.149
Scale Center U: 0.0686
Scale Center V: 0.5
Sphere2:
Offset U: -0.01
Offset V: -0.031
Scale U: 0.976
Scale V: 0.958
Scale Center U: 0.26
Scale Center V: 0.55
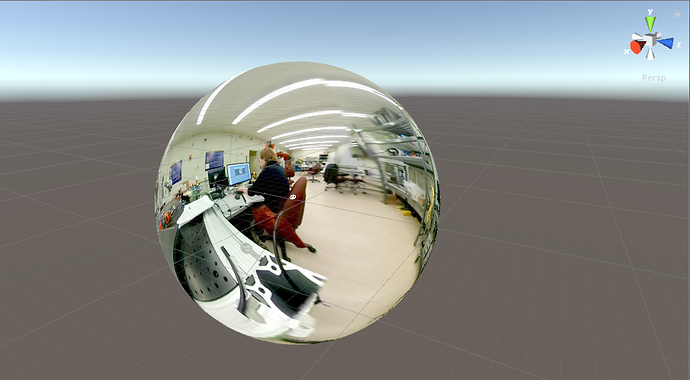
14.2.2. UVC FullHD Blender with Unity
The Ricoh application UVC FullHD Blender will stitch the two spheres on your Windows machine. Unfortunately, this is not usable within Unity. If you hack the registry, you can get Unity to recognize THETA UVC FullHD Blender.
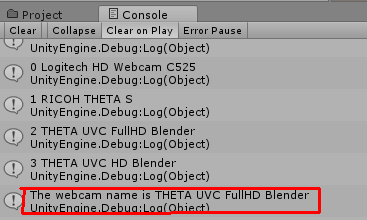
Using this technique, you can simply add UVC FullHD Blender as a WebCamTexture in Unity. The stitch
will look close to perfect.
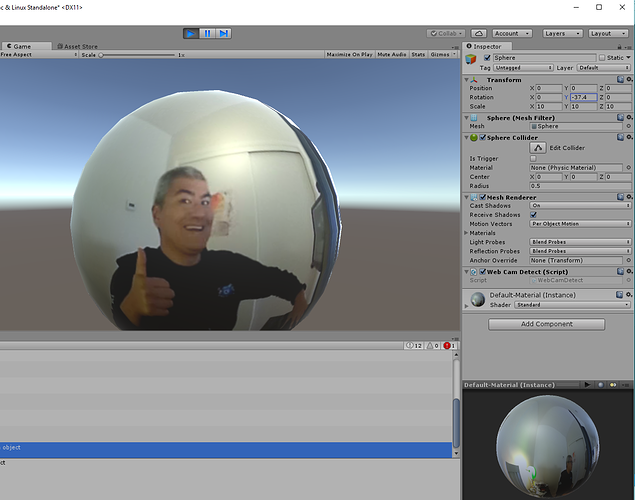
Here’s how to do it.
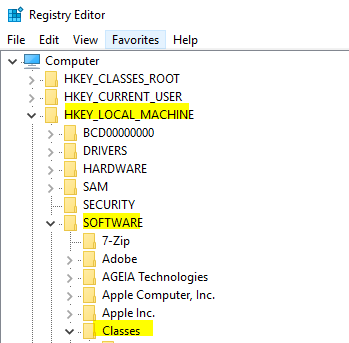
Edit Windows Registry
Open regedit on Windows. You will need to open the folders for HKEY_LOCAL_MACHINE → SOFTWARE → Classes.
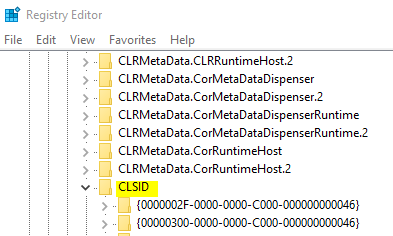
Open CLSID
Go to:
{860BB310-5D01-11d0-BD3B-00A0C911CE86}/Instance
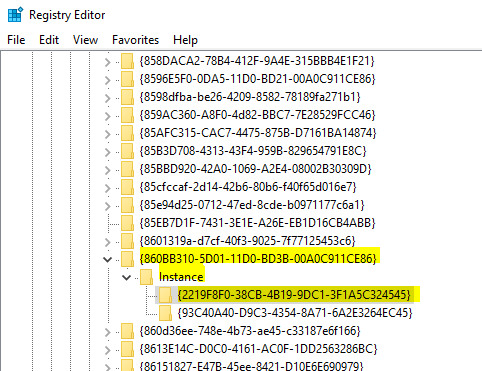
On my computer, THETA UVC FullHD Blender is
{2219F8F0-38CB-4B19-9DC1-3F1A5C324545}

Here’s a summary from this blog post that is the source of the regedit info.
"" The registry key is located under HKLM, SOFTWARE\Classes\CLSID{860BB310-5D01-11d0-BD3B-00A0C911CE86}\Instance (note it’s SOFTWARE\Classes\Wow6432Node\CLSID… in 64-bit OS for 32-bit app space), where every subkey corresponds to a registered device (find yours there). Note that CLSID above is actually CLSID_VideoInputDeviceCategory. ""
15. Untethered WiFi Streaming
Streaming from the THETA S using WiFi is primarily of interest to developers and hobbyists. If you have a THETA V, you can stream 4K video directly from the camera with Wi-Fi. The THETA V can stream either equirectangular 4K video or dual-fisheye if you use the plug-in technology.
15.1. Using Unity
The THETA S can live stream a 640x320 MotionJPEG at 10fps over WiFi. This is intended to preview a picture prior to taking the picture. It’s not intended for headset navigation. The community has built some solutions to stream this low-res, low fps video to mobile phones, primarily using Unity.
This is a short Vine video of a demo.
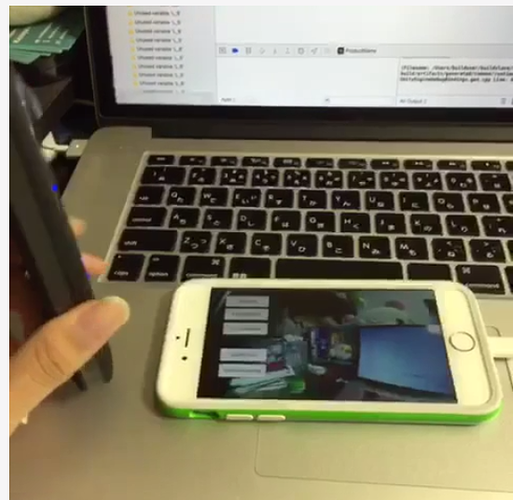
Most developers have challenges processing the MotionJPEG stream.
Fortunately, sample code of a THETA S WiFi streaming demo with Unity was developed by community member Makoto Ito. I’ve translated the README to his code as well as a related blog written by @noshipu, CEO of ViRD, Inc for his contribution.
15.1.1. About the RICOH THETA API
In order to use Wifi live streaming, you must use the _getLivePreview API.
Official Reference
NOTE from Craig: This was replaced by getLivePreview in version 2.1 of the API. This blog by Noshipu-san refers to the 2.0 API, which is still supported by the THETA S. Be aware of the differences in your code.
Unlike the other APIs, _getLivePreview is different because the data is in a stream and keeps going. You will not be able to get a WWW class to wait until the request is complete (maybe).
NOTE from Craig: This is the major problem developers have when working with
getLivePreview. As the data is a stream, you can’t want for the data to end before running your next command. For example, it’s different from downloading and displaying an image or video file because you know when the transfer is complete.
15.1.2. Processing Flow
Set the POST request to create a HttpWebRequest class
string url = "Enter HTTP path of THETA here";
var request = HttpWebRequest.Create (url);
HttpWebResponse response = null;
request.Method = "POST";
request.Timeout = (int) (30 * 10000f); // to ensure  no timeout
request.ContentType = "application/json; charset = utf-8";
byte [] postBytes = Encoding.Default.GetBytes ( "Put the JSON data here");
request.ContentLength = postBytes.Length;
Generate a class of BinaryReader to get the byte data (you get the bytes one by one)
// The start of transmission of the post data
Stream reqStream = request.GetRequestStream ();
reqStream.Write (postBytes, 0, postBytes.Length) ;
reqStream.Close ();
stream = request.GetResponse () .GetResponseStream ();
BinaryReader reader = new BinaryReader (new BufferedStream (stream), new System.Text.ASCIIEncoding ());
Get the start and stop bytes of 1 frame of the MotionJPEG and cut out one frame
With the byte, check the partion value of the MotionJPEG.
...(http)
0xFF 0xD8      --|
[jpeg data]      |--1 frame of MotionJPEG
0xFF 0xD9      --|
...(http)
0xFF 0xD8      --|
[jpeg data]      |--1 frame of MotionJPEG
0xFF 0xD9      --|
...(http)
Please refer this answer on StackOverflow to How to Parse MJPEG HTTP stream from IP camera?
The starting 2 bytes are 0xFF, 0xD8. The end bye is 0xD9
The code is shown below.
List<byte> imageBytes = new List<byte> ();
bool isLoadStart = false; // Binary flag taken at head of image
byte oldByte = 0; // Stores one previous byte of data
while( true ) {
    byte byteData = reader.ReadByte ();
if (!isLoadStart) {
    if (oldByte == 0xFF){
        // First binary image
       imageBytes.Add(0xFF);
    }
    if (byteData == 0xD8){
       // Second binary image
       imageBytes.Add(0xD8);
       // I took the head of the image up to the end binary
       isLoadStart = true;
    }
} else {
    // Put the image binaries into an array
    imageBytes.Add(byteData);
        // if the byte was the end byte
        // 0xFF -> 0xD9 case、end byte
        if(oldByte == 0xFF && byteData == 0xD9){
            // As this is the end byte
            // we'll generate the image from the data and can create the texture
            // imageBytes are used to reflect the texture
            // imageBytes are left empty
            // the loop returns the binary image head
            isLoadStart = false;
        }
    }
    oldByte = byteData;
}
Texture Generation Separated by Byte
This is the byte to reflect the texture.
mainTexture.LoadImage ((byte[])imageBytes.ToArray ());
Portion of Python code taken from StackOverflow answer.
import cv2
import urllib
import numpy as np
    stream=urllib.urlopen('http://localhost:8080/frame.mjpg')
    bytes=''
    while True:
        bytes+=stream.read(1024)
        a = bytes.find('\xff\xd8')
        b = bytes.find('\xff\xd9')
        if a!=-1 and b!=-1:
            jpg = bytes[a:b+2]
            bytes= bytes[b+2:]
            i = cv2.imdecode(np.fromstring(jpg, dtype=np.uint8),cv2.CV_LOAD_IMAGE_COLOR)
            cv2.imshow('i',i)
            if cv2.waitKey(1) ==27:
                exit(0)
Mjpeg over http is multipart/x-mixed-replace with boundary frame info and jpeg data is just sent in binary. So you don't really need to care about http protocol headers. All jpeg frames start with marker 0xff 0xd8 and end with 0xff 0xd9. So the code above extracts such frames from the http stream and decodes them one by one. like below.
...(http)
0xff 0xd8      --|
[jpeg data]      |--this part is extracted and decoded
0xff 0xd9      --|
...(http)
0xff 0xd8      --|
[jpeg data]      |--this part is extracted and decoded
0xff 0xd9      --|
...(http)
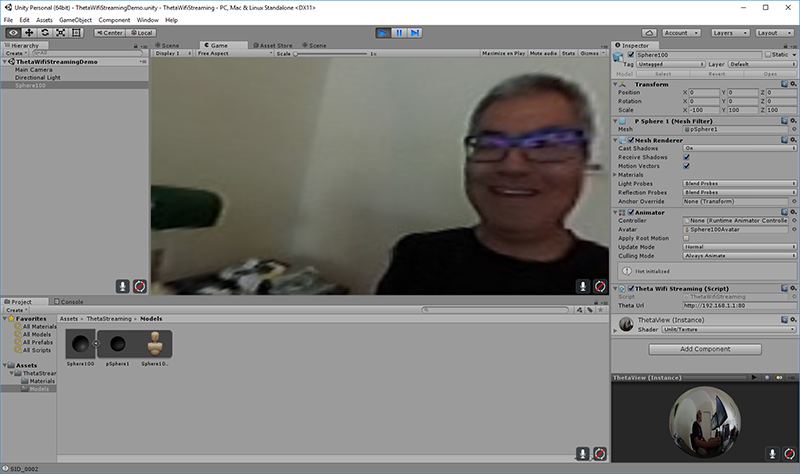
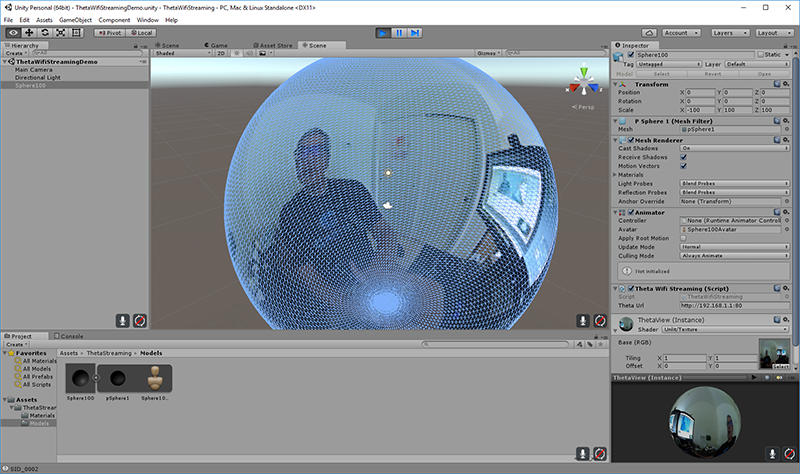
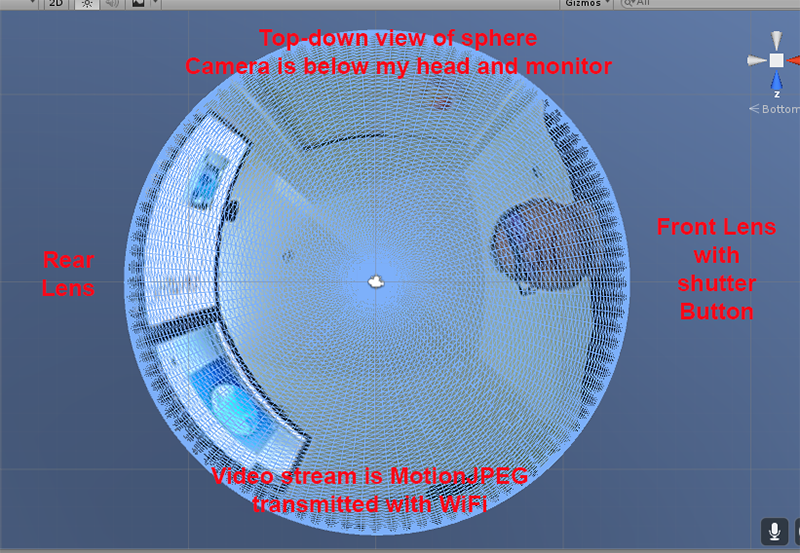
Testing WiFi Streaming
You can test out WiFi Streaming without having to program. Download and install Unity Personal Edition. It’s free.
Get Makoto Ito’s code for ThetaWifiStreaming.
Press Play.
15.2. Using a Raspberry Pi or Single Board Computer
A Raspberry Pi can take the video live stream from the THETA using USB and transmit the stream to another device using WiFi. This is intended for software developers to use as starting point.
There is sample code available for both the transmission of the live stream and the conversion of the live stream into a navigable 360 video using the THETA S. Both the browser and the server applications are written in JavaScript. The server application uses node.
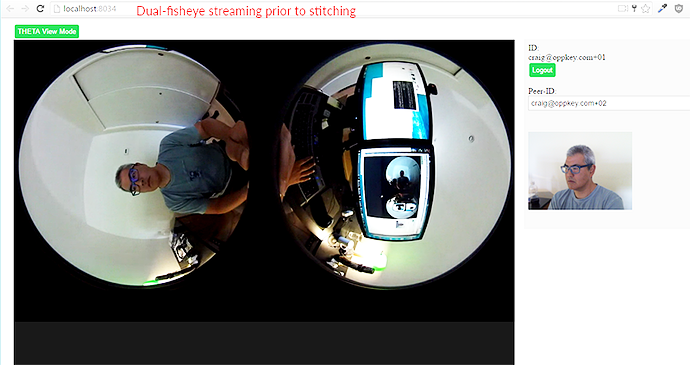
The sample code uses JavaScript to convert the dual-fisheye video stream into a navigable 360° video. Transmission uses WebRTC.
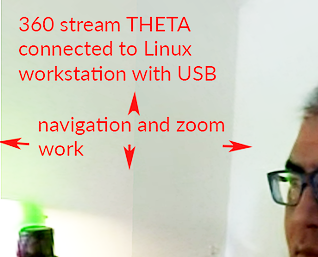
As the THETA V uses UVC 1.5 with H.264, there have been no reported successes using the Raspberry Pi. The THETA V can connect directly to the Internet with Wi-Fi and may be able to replace the function of the Raspberry Pi. The article, State of UVC 1.5 Support for Controlling H.264 has more information on the Linux kernel problem. Community members have reported success using the Linux kernel on Android with additional drivers. The article above has a link to a possible solution on GitHub.
16. FAQ
Q: What’s the Resolution and FPS of the THETA S?
A: Updated Oct 2016.
| Type | Format | Camera Mode | Size | Frame Rate | Connection |
|---|---|---|---|---|---|
Live View |
Equirectangular in MotionJPEG |
Image Only |
640x320 |
10fps |
WiFi |
USB Live Streaming of dual-fisheye |
Dual-fisheye in MotionJPEG |
live streaming |
1280x720 |
15fps |
USB Video Class 1.1 or 1.5 |
USB Live Streaming firmware 01.82 or above |
Dual-fisheye with H.264 |
live streaming |
1920x1080 |
30fps |
USB Video Class 1.5 |
HDMI live streaming of dual-fisheye |
Dual-fisheye in uncompressed YCbCr |
live streaming |
1920x1080, 1280x720, 720x480 |
30fps |
HDMI |
USB live streaming of equirectangular |
Equirectangular in MotionJPEG |
live streaming |
1280x720 |
15fps |
USB |
Q: Can I stream from a drone to a headset?
A: Only with expensive equipment. This is not a good use of the THETA for recreational hobbyists. Refer to this article for more information.
Q: Does the THETA have auto-stabilization?
A: No. You’ll need to use a third-party gimbal.
Q: Is anyone using the THETA 360° stream for object recognition?
A: Yes. Most people use the raw video from 2 fisheye spheres. Most people do not convert to equirectangular video. Just extract a portion of the sphere and perform the image recognition or measurement on that section. The HDMI stream has higher resolution. Most people are using that and extracting a frame, then performing the calculation. Known applications include facial recognition, audience emotion recognition, autonomous vehicle operation. As just one example, the winner of the RICOH prize at the 2016 DeveloperWeek Hackathon used the Microsoft Emotion API on the dual-fisheye spheres.
Q: Is anyone working on panoramic sound?
A: Yes. There are many projects for 3D sound, including SOPA, an open source JavaScript library.
Q: How do I increase the sound quality?
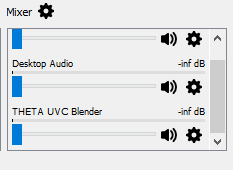
A: Use an external microphone and add it to your mixer. Set the THETA’s input to zero using your mixer. If you’re using OBS for the stream, plug your microphones into your computer and then add a new audio source from the main dashboard to your stream. There is no way to plug a microphone directly into the THETA.
17. Troubleshooting
17.1. Streaming to YouTube
17.1.1. Problem: Status:0x800705AA
-
Verify your THETA S firmware is 01.82 or above for UVC FullHD
-
Make sure your camera has the blue word
Livein LED lights on -
Toggle between webcam and UV Blender. If this still fails to resolve the problem, disable all other webcams and reboot
-
Try a different USB cable. Plug it into the port on the back of your computer
17.1.2. Problem: Screen is black with nothing on it
Check video resolution. Set to 1920x1080 if using UVC FullHD Blender.
17.1.3. Problem: Video on YouTube is Equirectangular with No Navigation
If the stream is in equirectangular on OBS and it can’t be navigated on YouTube, check your YouTube configuration.
17.2. Heat
The unit below overheated 16 minutes into the shoot. It is using UVC Blender and a USB cable during an indoor shoot at Stanford during a crowded VR event.
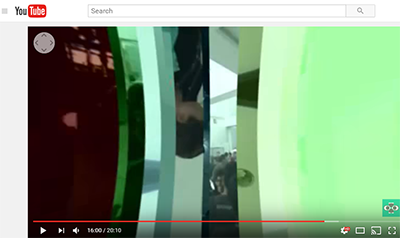
If the THETA is overheating, point a standard household fan at it. The airflow may be enough to cool the outside of the THETA and help with the internal overheating.
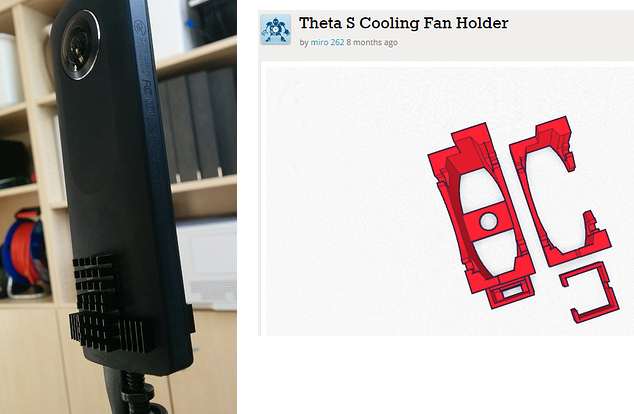
People have reported success by sticking $6 Raspberry Pi heatsinks onto the body of the THETA or taping or attaching a small fan used for computer CPUs to the outside of the THETA.
-
6 piece Addicore heatsink for Raspberry Pi for $5.95
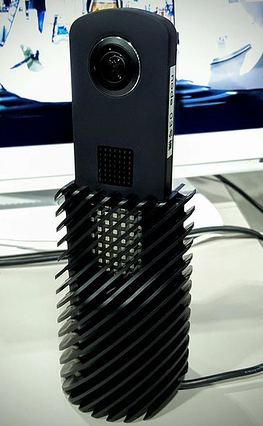
The enthusiast below created custom cases in plastic through a shop in Akihabara. He wanted to use metal, but the cost was too high.
18. Discuss
If you have questions, comments or additions, please post them in the THETA Unofficial Guide Forum.
If you have a product or service that you’ve verified works with the THETA, please join the THETA Developer Ecosystem. Once you’ve joined the ecosystem, you can post your product information in the Ecosystem Discussion category.