360 Camera Control of a RICOH THETA With a USB Cable

You can control your RICOH THETA with a USB cable. It’s a bit more difficult, but it’s great for projects that leave the THETA unattended in remote locations. Any computer can be used, but we focus on a Raspberry Pi due to low cost. Although a touchscreen is not needed, I built the demo using the official Raspberry Pi touchscreen as a control panel.
To get started quickly, I simply installed gphoto2 using apt.
gphoto2 turned out to be easier to use than ptpcam. So, start here if you’re
just getting started.
To program the Raspberry Pi, you’ll need to log into it either by serial cable, Ethernet or WiFi. In the picture below, the Raspberry Pi to the left is connected to my development workstation with a USB adapter connected directly to the GPIO pins. On the right, I’m using WiFi to program Raspberry Pi. Once the Pi is programmed, disconnect it from your development computer and it works standalone.

To start programming the Raspberry Pi to communicate over the THETA USB cable,
use gphoto -L to list the filesystem on the THETA.

To set the configuration of individual camera settings, you’ll need to get the codes from RICOH THETA v2 USB Reference
In the example below, I set the shutter chirp to 30% of sound volume and then verify that the setting in correct.
I’m going to set
0x502c AudioVolume.
Before we set it, take a look at the
documentation.

The documentation is sparse, but it has everything you need. Grab the Device Prop Code and focus in on the 502c code.
pi@raspberrypi ~/Development/libptp2-1.2.0 $ gphoto2 --set-config=502c=30
pi@raspberrypi ~/Development/libptp2-1.2.0 $ gphoto2 --get-config=502c
Label: PTP Property 0x502c
Type: MENU
Current: 30
Choice: 0 0
In the next example, we’ll use the command line options of gphoto2 to download three files from the camera to our local disk over the fast USB cable. The command line options of gphoto2 are easier to use than the Device Prop Codes, but the command line options don’t cover all the camera functions. Let’s run through a few easy examples of using gphoto2 command line options.
pi@raspberrypi ~/Development/gphoto2 $ gphoto2 --get-file 1-3
Downloading 'R0011757.JPG' from folder '/store_00010001/DCIM/100RICOH'...
Saving file as R0011757.JPG
Downloading 'R0011758.JPG' from folder '/store_00010001/DCIM/100RICOH'...
Saving file as R0011758.JPG
Downloading 'R0011759.JPG' from folder '/store_00010001/DCIM/100RICOH'...
Saving file as R0011759.JPG
pi@raspberrypi ~/Development/gphoto2 $

Download thumbnails
pi@raspberrypi ~/Development/gphoto2 $ gphoto2 --get-thumbnail 4-6
Downloading 'R0011761.JPG' from folder '/store_00010001/DCIM/100RICOH'...
Saving file as thumb_R0011761.jpg
Downloading 'R0011763.JPG' from folder '/store_00010001/DCIM/100RICOH'...
Saving file as thumb_R0011763.jpg
Downloading 'R0011764.JPG' from folder '/store_00010001/DCIM/100RICOH'...
Saving file as thumb_R0011764.jpg
pi@raspberrypi ~/Development/gphoto2 $
Components I Used
- Raspian Jessie
- gphoto2
- Raspberry Pi 2
- THETA plugged into Raspberry Pi with USB cable
Versions
Showing installed gphoto2 version with apt-cache
pi@raspberrypi ~ $ apt-cache show gphoto2
Package: gphoto2
Version: 2.5.4-1
Architecture: armhf
Maintainer: Debian PhotoTools Maintainers <pkg-phototools-devel@lists.alioth.debian.org>
Installed-Size: 802
Depends: libaa1 (>= 1.4p5), libc6 (>= 2.4), libcdk5, libexif12, libgphoto2-6 (>=2.5.2), libgphoto2-port10 (>= 2.5.2), libjpeg8 (>= 8c), libncurses5 (>= 5.5-5~), libpopt0 (>= 1.14), libreadline6 (>= 6.0)
Suggests: gtkam, gthumb
Homepage: http://www.gphoto.org/proj/gphoto2/
Priority: extra
Section: utils
Filename: pool/main/g/gphoto2/gphoto2_2.5.4-1_armhf.deb
Size: 169204
SHA256: 71baeac776e762229ad31c550a493a82a8fd5f2a435dd65a674d0030d14f8991
SHA1: 7018ffe0a8432ffcfbb08887f27b2ae22224b2fd
MD5sum: a522290cef04bf1cf7c6cdb4d0cf37d5
Description: digital camera command-line client
The gphoto2 library can be used by applications to access various
digital camera models, via standard protocols such as USB Mass Storage
and PTP, or vendor-specific protocols.

This package provide the gphoto2 command-line frontend.
Showing installed OS on Raspberry Pi
pi@raspberrypi ~ $ cat /etc/os-release
PRETTY_NAME="Raspbian GNU/Linux 8 (jessie)"
NAME="Raspbian GNU/Linux"
VERSION_ID="8"
VERSION="8 (jessie)"
ID=raspbian
ID_LIKE=debian
Troubleshooting
Right now, I get this error when I first step the Raspberry Pi. I haven’t bothered to disable gvfs-gphoto2-volume-monitor at boot yet. I’ll figure this out in the future.
pi@raspberrypi ~ $ gphoto2 --about

*** Error ***
An error occurred in the io-library ('Could not claim the USB device'): Could not claim interface 0 (Device or resource busy). Make sure no other program (gvfs-gphoto2-volume-monitor) or kernel module (such as sdc2xx, stv680, spca50x) is using the device and you have read/write access to the device.
*** Error (-53: 'Could not claim the USB device') ***
It looks like I can prevent the daemon in /usr/lib/gvfs/gvfsd to run. In the meantime, I’m going to kill the processes before I start the tests.
You can find the process to kill with ps aux |grep gvfs

I also killed the spawner. In my test this morning, I needed to kill this in addition to gvfs-gphoto2-volume-monitor

Test it
pi@raspberrypi ~ $ gphoto2 --about
About the camera driver:
PTP2 driver
(c) 2001-2005 by Mariusz Woloszyn <emsi@ipartners.pl>.
(c) 2003-2014 by Marcus Meissner <marcus@jet.franken.de>.
This driver supports cameras that support PTP or PictBridge(tm), and
Media Players that support the Media Transfer Protocol (MTP).

Enjoy!
Remove gvfs-gphoto2-volume-monitor
As I do not plan to mount the THETA as a storage device from the Raspberry Pi, I removed gvfs virtual filesystem.
Remove gvfs-backends
pi@raspberrypi ~ $ sudo apt remove gvfs-backends
Reading package lists... Done
Building dependency tree
Reading state information... Done
The following packages will be REMOVED:
  gvfs-backends
Test to make sure it still works.
pi@raspberrypi ~ $ gphoto2 -l
There is 1 folder in folder '/'.
 - store_00010001
There is 1 folder in folder '/store_00010001'.
Reboot
gphoto2 now works after reboot without having to kill the processes.
pi@raspberrypi ~ $ gphoto2 -l
There is 1 folder in folder '/'.
 - store_00010001
There is 1 folder in folder '/store_00010001'.
 - DCIM
There is 1 folder in folder '/store_00010001/DCIM'.
 - 100RICOH
There are 0 folders in folder '/store_00010001/DCIM/100RICOH'.
USB Programmer for the Raspberry Pi
If you want to program the Raspberry Pi through your USB port of your development computer, this is what I’m using.

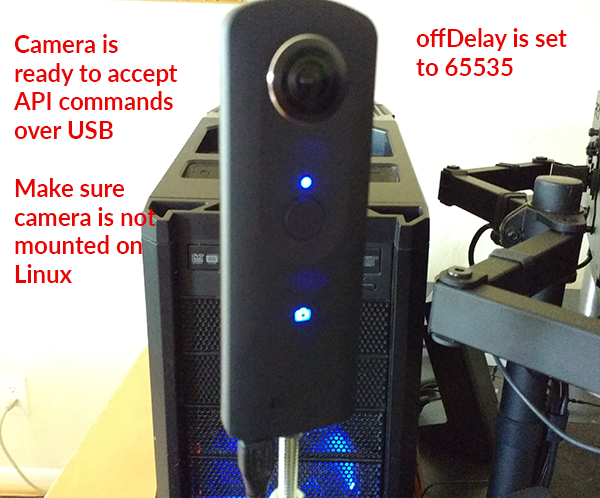
Preventing Camera from Turning Off
You can leave the camera turned on indefinitely when connected to the USB cable as the cable powers the camera.
Make sure you set the offDelay to 65535

{"name": "camera.setOptions",
    "parameters":
	{
    "sessionId": "SID_0001",
    "options": {
		"offDelay": 65535
    	}
	}
}
You can check the offDelay parameter with this:
{"name": "camera.getOptions",
    "parameters":
	{
    	"sessionId": "SID_0001",
    	"optionNames": [
            "offDelay"
    	]
	}
}
I also set the sleepDelay to 65535.
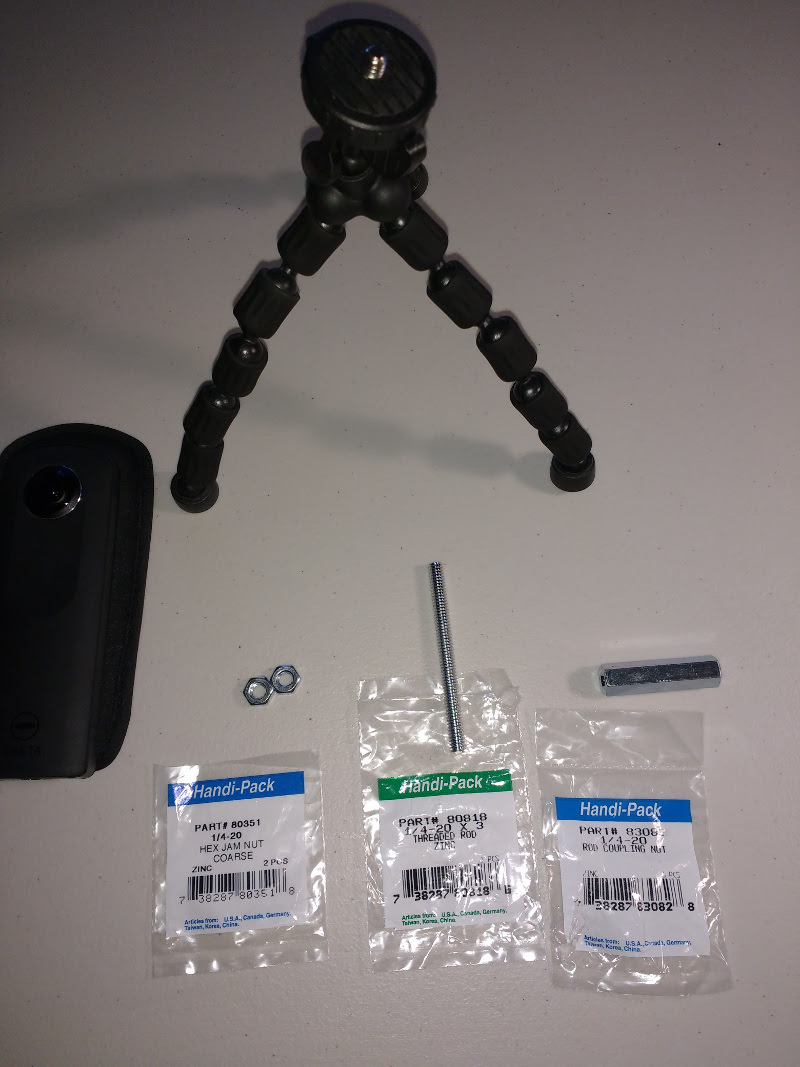
Mounting Your Camera
You need to use an extension to mount the camera on a tripod so that it doesn’t interfere with the USB cable.
It’s 1/4” by 20 pitch.
- 1 pc 1/4” by 20 pitch rod coupling nut
- 1 pc 1/4” by 20 pitch threaded rod, 3 inches long
- 2 pcs 1/4” by 20 pitch hex jam nut

Using Microsoft Windows
Refer to the MTP Extensions.
See this note from Matt Wymore
I figured out how to make this work. This feature does work correctly, you just have to issue “raw” MTP/PTP commands to get it to work. So if anybody else is using the Windows Portable Devices API to control the Theta S, keep this in mind:
It looks like you can’t use the WPD command WPD_COMMAND_STILL_IMAGE_CAPTURE_INITIATE to initiate capture. If you use this command the driver returns an error to you.
The correct way to do this is to use WPD_COMMAND_MTP_EXT_EXECUTE_COMMAND_WITHOUT_DATA_PHASE and set up all the parameters and Op Code for image capture and then send that command. Take a look at this example from Microsoft for setting things up. Basically you just need to change the Op Code to 0x100E (for initiate capture) and change the StorageID to 0x0 (as documented in the Theta v2 USB API) and you are ready to go.
Example Matt referred to.